Family Meal

by Chef David Ferguson

PERSONAL CHEF SERVICES 

& PRIVATE EVENTS


Filtering by Category: Desserts,Recipes

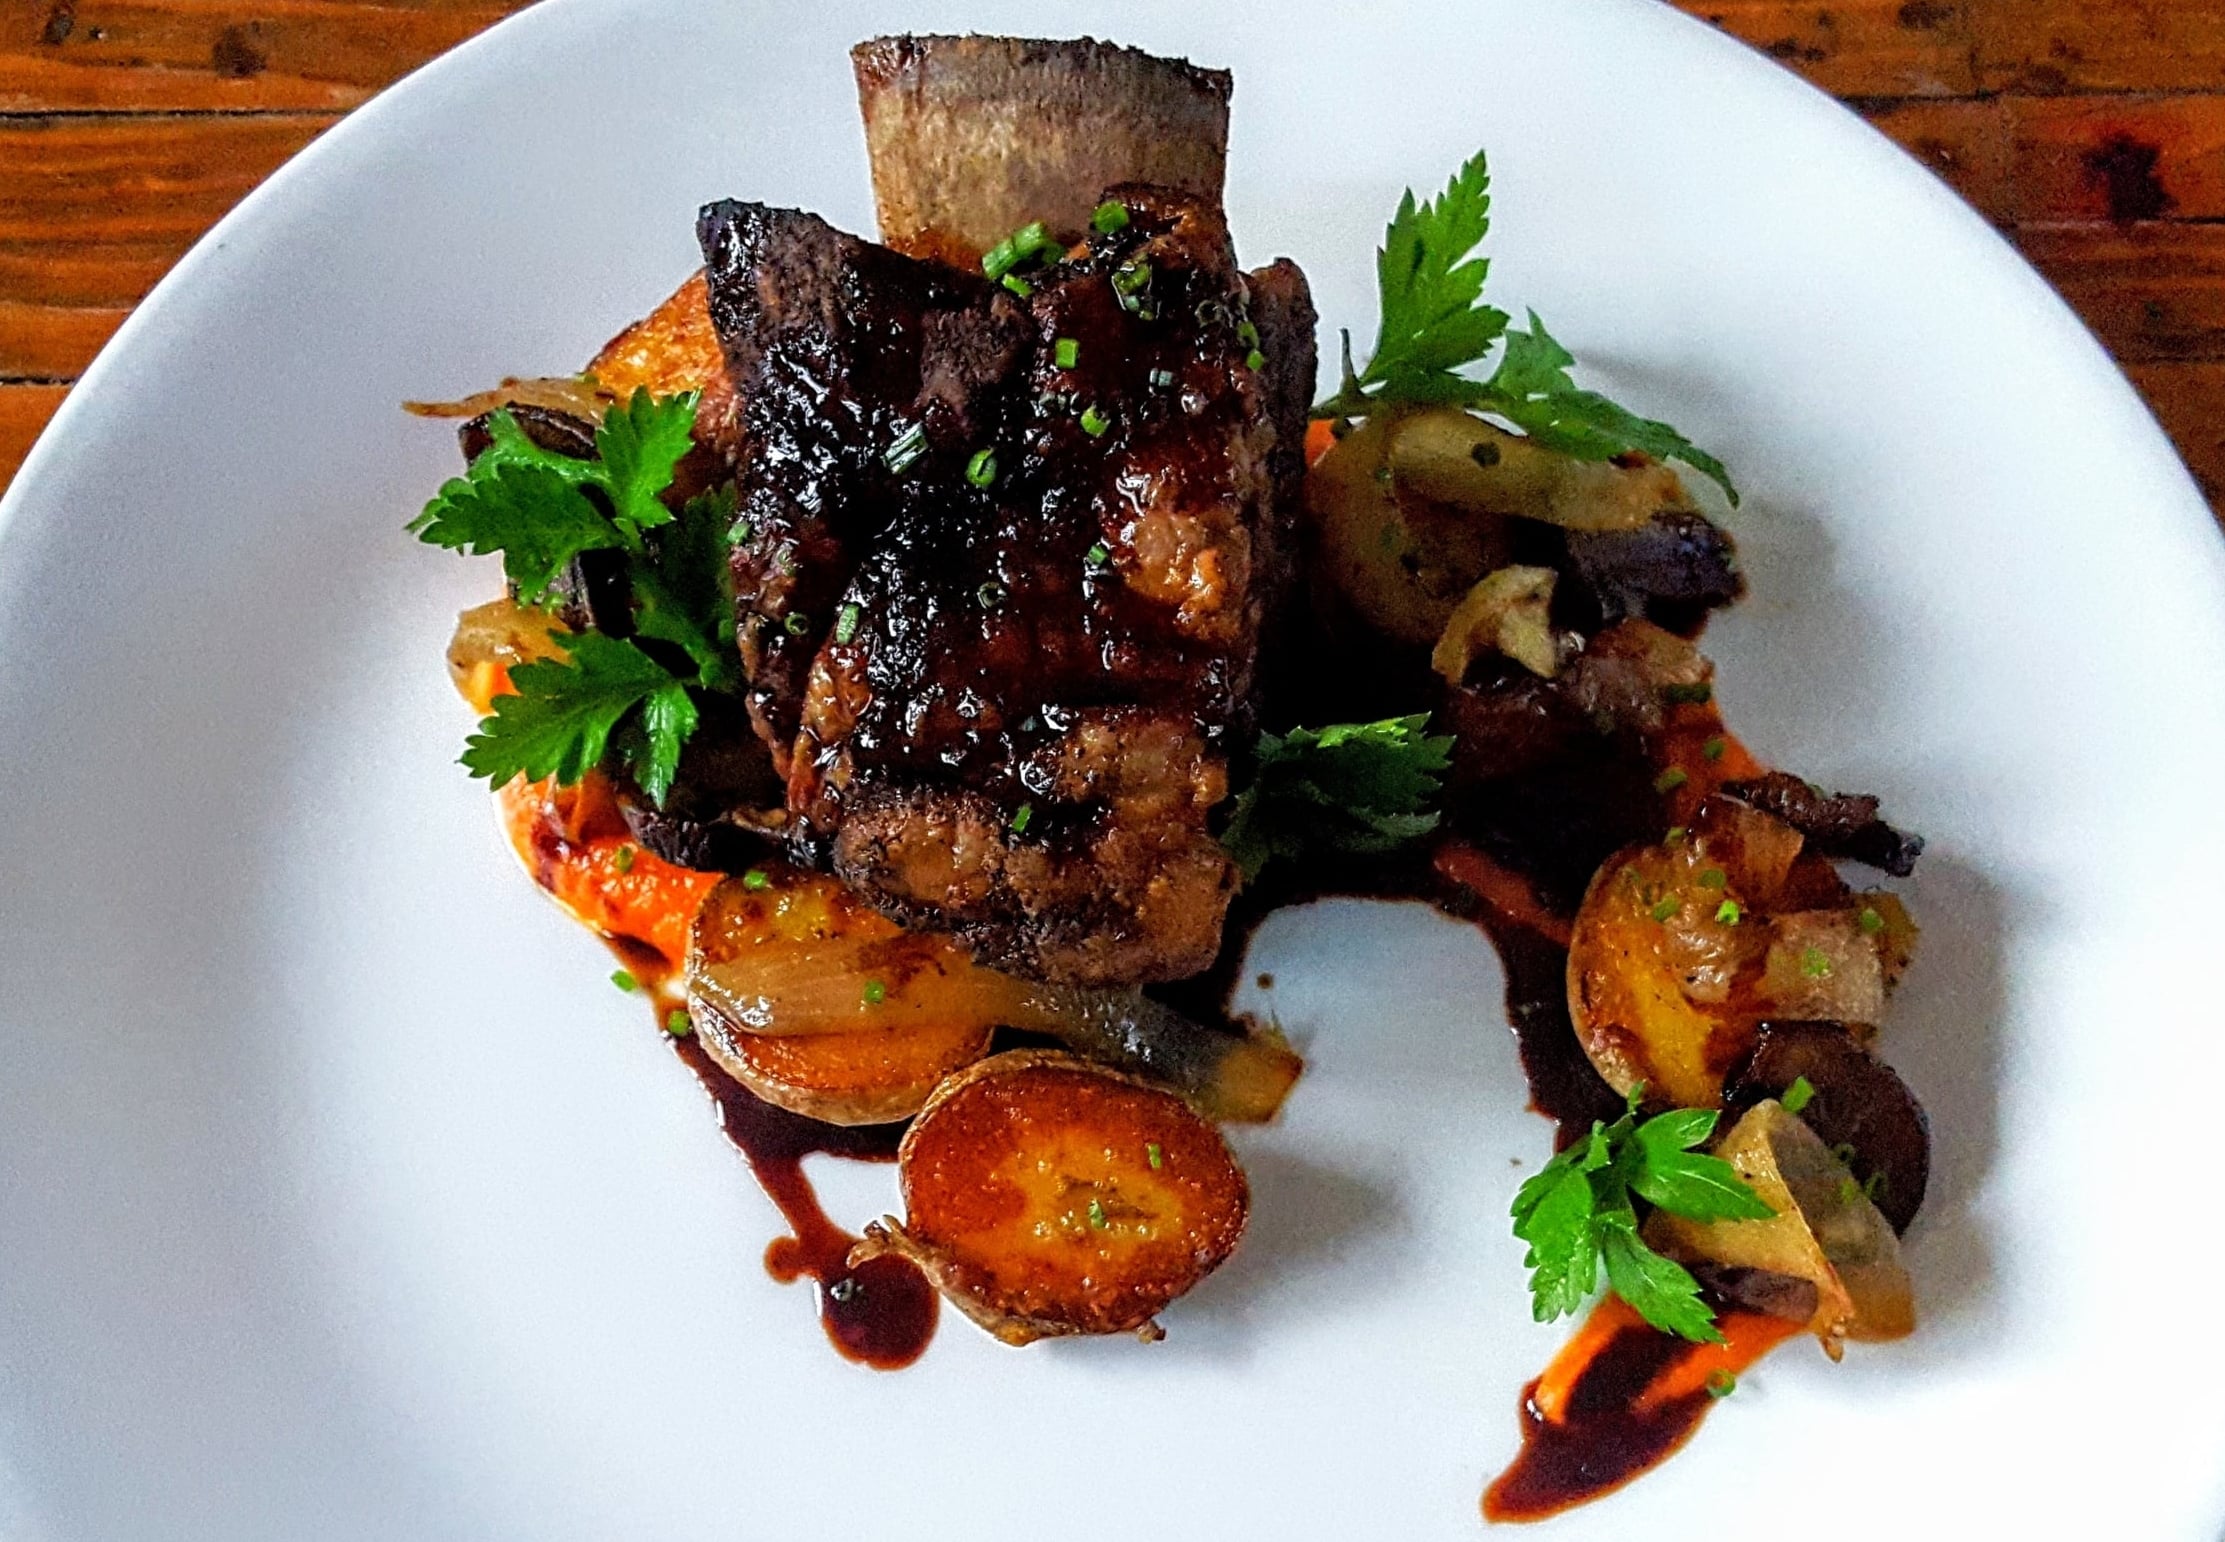
Braised Beef Short Ribs, Sweet Carrot Puree, Pan Roasted Baby Potatoes, Button Mushrooms, & Seared Onions


Prep Time:  40 min    Cook Time:  2 ½ hrs    Serves:  2


Winter weather and colder temperatures call for a hearty braise.  This recipe may seem daunting, but fortunately most of the work is done in the oven. Developing the flavors gradually will help ensure you have a robust dish with decadent texture. Trust me; it’ll be well worth it in the end.

To begin, sear the ribs on high heat in a large pan on all sides. Sautéing the carrots, celery and onions in the leftover drippings will produce caramelization and build the deep flavors that a good braise delivers. 

When preparing the carrots, cut them into equal size slices and simmer in water with sugar and salt.  Cook the carrots until they are extremely tender, and reserve the liquid used to simmer them to make your puree.  Gradually add the reserved liquid as you process the carrots so you don’t accidentally add too much.  

The mushrooms are cooked twice; once in the oven to remove excess water, and then finished in a pan with butter when you’re ready to serve.  It’s important to cook them this way, as simply placing them in the pan first will result in soggy mushrooms that have steamed in their own liquid.

Cook the onions quickly in butter over med-high heat.  You want to cook them fast with higher heat and let them retain some texture while still picking up some flavor from the pan.  

When the ribs are finished, strain the solids out of the braising liquid and reduce until thickened for use as a sauce.  You may need to skim the liquid to remove some excess fat.  Simply remove the thin translucent layer of fat that will accumulate on top with a ladle and allow the liquid to reduce until it coats a spoon.  Stir in a small knob of cold butter to finish the sauce off the heat.


INGREDIENTS:

● 1 lb bone in beef short ribs

● 48 oz beef stock

● 1 cup  Amber ale

● 2 celery stalks, cut into ¼” slices

● 7  medium carrots, peeled and divided (2 cut into ¼” slices, 5 cut into 1/2 “ rounds)

● 1 ½  yellow onion, divided (1 rough chopped, ½ sliced into ¼” crescents)

● 2 cup button mushrooms, chopped

● 2 oz bacon

● 6 baby yukon potatoes

● 6 oz chives, divided (4 oz whole, 2 oz chopped fine)

● 4 oz thyme, whole

● 4 cloves garlic, minced

● 2  tbs olive oil

● 4 tbs vegetable oil, divided

● 4 tbs butter, divided

● 3 cups water

● ¼ cup granulated sugar

● salt and pepper to taste

● flat leaf parsley for garnish

method:

Preheat oven to 325 degrees.  Place a large pan over high heat with 2 tbsp vegetable oil. While the pan is heating, season all sides of your short ribs liberally with salt and pepper.  When the pan has come up to temperature, begin searing the short ribs for 1 minute on each side.  When all sides have been seared, remove the short ribs from the pan and set aside.  

Remove any used oil from the pan. Reduce to medium heat and add in remaining 2 tbs of vegetable oil, garlic and rough chopped onions, stirring occasionally.  Cook for 2 minutes before adding in the celery and carrots.  Allow carrots and celery to begin to brown before pouring in the beer. Begin stirring with a wooden spoon or rubber spatula to remove any brown bits from the bottom of the pan. Continue stirring to allow the beer to reduce and evaporate before returning the short ribs to the pan. Once in the pan, pour in enough stock to almost cover them leaving only the very top of the short rib exposed.  Add in the whole chives, thyme, and bacon and bring to a boil. Put on the  lid and place   in the oven for two hours. 

Coat the chopped mushrooms evenly with 2 tbsp of olive oil before spacing them apart on a lined sheet tray. Roast in the oven for 15-20 mins to remove any excess moisture and then set aside.  

Combine the remaining carrots with the water, sugar, and a liberal pinch of salt in a small sauce pot.  Set the pot over medium heat and bring up to a simmer, allowing the carrots to cook until very tender.  Strain off the carrots, reserving a ¼ cup of the liquid.  Add carrots to a blender and begin blending on low, gradually easing towards high to avoid splatter.  Carefully pour in reserved liquid in stages, pureeing the carrots until very smooth.  Season with salt (to taste) and set aside. 

Place a medium sauté pan over medium-high heat and add in 1 tbsp butter.  Place the reserved onions into the pan and season lightly with salt.  Allow the onions to cook until they soften and start to brown, tossing occasionally.  Reserve the onions once they have finished.

Place potatoes in a medium sauce pot and cover with water.  Season the water heavily with salt and set the potatoes over medium heat to simmer until fork tender.  Remove the potatoes from the water and slice in half.  

Once the short ribs are fork tender, remove from the pan and strain off the solids in the liquid.  Return the liquid and short ribs back to the pan and reduce over medium high heat.  

Finish the mushrooms and potatoes while the braising liquid is reducing. Place a medium sized pan over medium heat and melt 1 tbsp of butter. Place the potatoes cut-side down into the pan.  Cook for two minutes on each side until golden brown, remove from pan, and set aside.

Return pan to high heat, along with 1 tbsp of butter. Add the mushrooms and allow to brown, tossing occasionally. Once browned, incorporate the chopped chives and potatoes and season with salt and pepper to taste.  .  

Once the braising liquid has reduced to the point where it will coat a spoon, remove the short ribs.  Add remaining 1 tbsp of butter and stir to emulsify.  Serve the short ribs, potatoes, and mushroom over the carrot puree spooning the reduced sauce on top. Finish by garnishing with whole parsley and the browned onions. Enjoy!


Mushroom Risotto with Shiitake Mushrooms & Asparagus Tips


Prep Time:  1 hour    Cook Time:  40 min    Serves:  4


Risotto is an amazing dish.  Like all great food, properly preparing risotto requires attention and love.  You can't just walk away from risotto and come back to it later, you need to be there to develop texture and flavor.  Similarly, the mushrooms and asparagus in this recipe are given their own special treatment before bringing everything together, but this also pays off in texture and flavor.  

I only used the tops of the asparagus and sauteed them quickly over medium high heat.  Roasting the mushrooms in the oven first will help to remove excess water, so that when they are finished by sauteing in butter they crisp up and sear instead of just steaming.  Don't add the mushrooms and asparagus until the risotto is finished cooking and you have already added the cheese and butter.  If it becomes too tight, add a little more stock to develop more of a sauce.  Finish with fresh chives and shaved Parmesan and a drizzle of olive or truffle oil.


20160107_152326 (1).jpg

ingredients:

  • 2/3 cup Arborio rice (or similar risotto rice)
  • 3 cups unsalted chicken stock
  • 1 cup asparagus tips
  • 12 oz shiitake mushrooms (or hen or the woods, Porcini, oyster, morels, etc...)
  • 2 oz fresh chives, finely chopped
  • 1/2 shallot, finely chopped
  • 4 cloves garlic, minced
  • 1 cup shaved Parmesan
  • 1 cup dry white wine
  • 6 tbsp butter (divided)
  • 2 tbsp olive oil (divided)
  • salt and pepper to taste
  • olive oil or truffle oil for garnish

Method:

Preheat oven to 350 degrees.  Wipe the mushrooms down with a damp cloth to remove any  lose dirt.  Toss the mushrooms with 1 tbsp olive oil, salt and pepper in a bowl to coat.  Spread mushrooms out on a lined sheet pan and place in oven for 20 minutes. Remove once done and set aside to dry.

Slice the tops off 1 pound of asparagus to yield approximately 1 cup.  Make sure to cut the tips into appropriate sized pieces, about 1/2".  Heat  2 tbsp butter in a medium saute pan over medium high heat and add the asparagus.  Season lightly with salt and pepper and toss, cooking until just tender then set aside.

Return to your mushrooms.  Heat 2 tbsp butter in a medium saute pan  over medium high heat and add your mushrooms, tossing and cooking until browned.  Season with salt and pepper and remove from heat. Chop into 1/4" slices. 

Prepare shallots and garlic and heat 2 tbsp olive oil in a large sauce pan over medium heat.  Add shallots and garlic, cooking until the shallots become translucent and the garlic becomes aromatic.  Add the risotto rice to the pan and cook for one minute, stirring constantly.  Pour in the wine and continue stirring, letting the wine evaporate completely.  Once the wine has evaporated, begin to ladle in the chicken stock.  Continue stirring constantly as the stock evaporates and you continue to add more one ladle at a time.  It is important to stir the rice as this constant motion is what develops the starches that creates the creaminess in risotto.  Continue stirring and adding stock until the rice reaches an al dente texture (tender but still slightly firm to the bite).  Add in the cheese and finish with butter and the chopped chives.  Toss in asparagus and mushrooms, adding more stock if the rice becomes too tight and needs more sauce.  Plate and garnish with a drizzle of olive or truffle oil.

A Better Chicken Dinner Part 1: Pan Roasted Chicken Breast with Cranberry Chutney, Savory Onions, & Jus


Prep Time: 40 min    Cook Time:  20 min    Serves:  2


Chicken is the workhorse of the american dinner menu.  A go to. A staple.  Chicken is a fantastic and versatile protein but it often suffers from an image problem as a boring, bland and unimaginative dish.   With the A Better Chicken Dinner series, I  hope to change that perception with a dose of creativity and basic technique.  Because the weather has turned colder, this dish has plenty of big hearty flavors and indulgent textures.   This would go well with some hearty mashed potatoes or some oven roasted root vegetables to play off the sweetness of the chutney and onions.


PREPARATION:

Preheat oven to 400 degrees.  In a medium sauce pot, pour 28 oz of chicken stock and set over medium heat to reduce.  Reserve the remaining half cup of stock.  

Remove the top and bottom of the onion and give it a medium dice.  Put a saute pan over med-low heat and add the tbs of vegetable oil and onions, salting liberally.  Allow the onions to cook down slowly as you finish the rest of your preparation, occasionally returning to the pan and deglazing with the remaining chicken stock as the onions stick to the pan.  Cook until tender and translucent.

For the chutney, cook shallots in oil in a 3-quart heavy saucepan over moderate heat, stirring occasionally, until softened. Stir in remaining ingredients. Simmer, stirring occasionally, until berries just pop, 10 to 12 minutes, then pulse in a food processor to achieve desired texture.

Season both sides of the chicken liberally with salt and pepper.  Place a large saute pan over high heat and add a tablespoon of oil.  Make sure the oil and pan are sufficiently heated to make sure the chicken doesn't stick to the pan (look for slight wisps of smoke coming off the pan).  Place the pan in a preheated oven, turning after 5 minutes.  Remove chicken from oven after 10 minutes or once internal temperature reaches 160 degrees. Remove chicken from pan and reserve pan with drippings. 

Return to the reducing stock. Pour stock into the reserved chicken pan and use a wooden spoon to incorporate any drippings and continue to reduce over medium high heat until stock has thickened and will coat a spoon. Add the butter to the stock and reduce heat to keep to the sauce from breaking.  Season lightly with salt and pepper to taste, 


ingredients:

CHICKEN & ONIONS

  • 2 (6 oz) chicken breast filet
  • 1 medium yellow onion
  • 1 (32 oz) carton unsalted chicken stock
  • 2 tbs coarse chopped parsley (for garnish)
  • 2 tbs vegetable oil
  • 1 tbs unsalted butter
  • salt & pepper to taste

CRANBERRY CHUTNEY

  • 5 shallots (6 oz), coarsely chopped
  • 1 1/2 tbs vegetable oil
  • 1 (12-oz) bag fresh or frozen cranberries
  • 2/3 cup sugar
  • 1/4 cup cider vinegar
  • 1 tsp minced garlic
  • 1 tsp minced peeled fresh ginger
  • 1/2 tsp salt
  • /2 tsp black pepper

New England Surf & Turf: Filet Medallion, Sweet Corn Succotash, & Lobster Tail with Cherry Tomatoes


Prep Time: 45 min    Cook Time:    20 min    Serves:  2


The sweetness of the lobster tail and cherry tomatoes compliments and balances the savory intensity of a perfectly grilled steak.  To ensure a good sear and crust on the steak, season liberally with salt and pepper and let it sit at room temperature for a half hour before grilling.  Depending of your desired temperature (I would suggest a medium-rare or medium, any additional cooking will degrade the texture of the steak, which is really what you're paying for in a filet),  set your grill to high or medium-high and baste the steak with melted butter.  This will cause the grill to flare and make a bit of a mess, but the quality of the sear you get from this technique is second to none.  Pull the steak off the heat 10-8 degrees before it reaches desired temperature and let it rest for 10 mins before eating.  

Lobster is cooked quickly to avoid a rubbery texture.  Saute over medium-high heat in butter with  the cherry tomatoes.  Add white wine and lemon juice to heighten flavor, finish with fresh herbs/ For the vegetables as well, hot and fast is the preferred cooking method.  Heat vegetable oil in a saute pan over high heat and add all the vegetables at once.  Once they begin to pick up color, add some vegetable stock to the pan and toss in a small pat of butter. The evaporating stock and butter should emulsify with a couple quick tosses of the pan. Finish with fresh chopped parsley.  


INGREDIENTS:

Succotash

  • 1 ear yellow sweet corn, cut off the cob
  • 6 large asparagus spears, cut into 1/8 in pieces
  • 1 large red bell pepper, diced
  • 3 cloves garlic, minced
  • 1 shallot, finely diced
  • 1/4 vegetable stock
  • 1 tbs butter
  • 2 oz fresh chopped parsley
  • salt and pepper to taste

Lobster

  • 2 lobster tails, removed from shells and chopped
  • 1/2 cup cherry tomatoes, quartered
  • 1/2 shallot, finely diced
  • 3 tbs butter
  • 1/4 cup white wine
  • 1 tbs fresh lemon juice
  • 1 oz fresh chopped tarragon
  • 1/2 oz fresh chopped parsley
  • 1/2 oz fresh chopped chives
  • 1/2 oz fresh chopped basil
  • 1/2 oz fresh chopped English thyme

Steak

  • 3 tbs butter, melted
  • liberal salt and pepper


PREPARATION:

Preheat grill. Remove steak from fridge and season liberally on both sides with salt and pepper.  Allow the steak to sit out at room temperature as you prepare the rest of your ingredients.  Prepare the vegetables for the succotash. Make sure all cuts are consistent to  ensure even cooking.  Set aside.

Remove lobster meal from shells by piercing the underside of the tail with the tip of your knife and bisecting the tail lengthwise.  Remove meat and chop. Set aside.  Quarter cherry tomatoes then dice the shallot finely, setting both aside once done.

Once the ingredients for the succotash and lobster have been prepared, melt the butter for the steak.  Baste the steak and place on the grill, being mindful of any flares that jump up.  Cook 4-5 mins on each side for med-rare, adding an additional minute for medium, 2-3 for med-well, basting the other side before flipping over.  Remove the steak 8-10 degrees before desired temperature is reached to ensure it doesn't overcook (120 for medium rare, 130 for medium, 140 for med well, 150 for well done). Let the steak rest while you finish the veg and lobster.  

Heat 2 tbs vegetable oil in a large saute pan over med high heat.  Add the garlic and shallots, stirring often,and then add the corn, peppers, and asparagus.  Once the vegetables have begun to pick up some color (1-2 min) add the stock and butter, tossing as the stock evaporates to help the butter emulsify and form a light sauce.  Season and add fresh herbs. 

Plate the succotash in the middle of the plate and set steak on top.  Reserve pan used for vegetable to finish the lobster.  Return pan  to med high head and add 3 tbs butter.  Once butter is melted, add the shallots, cooking for 1-2 mins until tender.  Next, add the tomatoes and lobster, stirring frequently.  Add the wine, butter, and herbs, stirring until  the wine evaporates and creates a slightly thickened sauce. Finish with lemon juice and pinch of salt. Serve over steak


Striped Bass with Corn & White Bean Succotash


Prep Time:  20 min Cook Time:  15 min  Serves:  2


This is a perfect dinner for a warm summer night when you want something savory and fulfilling but not too heavy.  Prep in the kitchen is simple and quick, so you don't need to spend an hour over a hot stove.  Everything in this dish is fresh and seasonal, ensuring bright and vibrant flavors. Pair this with a light white wine, a wheat beer, or a brisk cocktail like a Moscow mule or mint julep.  


Light, fresh, and perfect for summer

Light, fresh, and perfect for summer

ingredients:

  • 2 half pound striped bass fillets (skin off)
  • 1/2 cup fresh yellow sweet corn 
  • 1/2 cup fresh English green peas
  • 1 cup fresh spinach
  • 1/2 cup great northern beans (rinsed and drained)
  • 1 tsp oregano
  • 1 tsp chives
  • 1 tsp parsley
  • 1/4 cup thyme
  • 1/2 lemon (zested and juiced)
  • 1/2 tbs garlic (finely chopped)
  • 1/2 tbs shallots (finely chopped)
  • 4 tbs vegetable oil
  • 1 tbs butter
  • 1/4 vegetable stock
  • Salt and pepper to taste

PREPARATION:

Preheat oven to 400 degrees.  Remove fish from the fridge and season both sides liberally with salt and pepper. Set aside on a small plate.  Seasoning and allowing the fish to come up to room temperature before you cook it will ensure a good sear and proper texture.  Add half the vegetable oil to a large saute pan over med-high heat.  When the oil shimmers, gently place the fish into the pan and immediately place in the oven for five minutes.  After the five minutes flip the fish and place back over medium heat, adding the butter to the pan and basting the fish until the top is crispy and brown.  Remove fish from the pan and let rest to the side tented in a piece of aluminum foil.  Pour off any used oil and return pan to medium heat adding the remaining reserved vegetable oil.  Add garlic and shallots to the pan, saute until fragrant  and then add the corn. Once the corn has started to cook add the peas and then the beans, tossing occasionally.  Finally add the spinach, tossing until it just starts to wilt.  Season with salt and pepper and lemon zest and plate the corn mixture, positioning your fish atop the succotash and reserving the pan for one final step.  Return the pan to medium heat, pour in vegetable stock and lemon juice and stir with a wooden spoon to lift the flavors off the pan.  Simmer lightly.  Toss in butter and herb mixture and lower heat, stirring sauce until thickened.  Spoon sauce lightly over fish and serve.  


Six Hour Ribs


Prep Time: 20 min  Cook Time:  Approx. 6 hours   Serves:  5-6


Nothing and I mean nothing is more satisfying than biting into perfectly cooked ribs you smoked yourself.  The time and effort required is matched every bit by the tender and flavorful meat, the caramelized bark, and the ever elusive smoke ring marking your good work.  This recipe is less daunting than the name eludes, requiring mostly that you just monitor the temperature and occasionally give the ribs a little love. If you happen to place your smoker next to a pool, as I have done here, then so much the better.

They are worth the time...trust me.

They are worth the time...trust me.

 I created a makeshift smoker here that worked alarmingly well out of a classic Weber charcoal grill.  The configuration can be seen here, but if you have your own trusted method feel free to deploy it in place of my technique. The key elements remain the same; gentle heat, long cooking time, and a source of humidity. 

Low and slow is the key to any successful barbecue. The swirling smoke, low temperature and slow cooking time allow for the muscle and connected tissue to break down from the gentle heat and yield that classic barbecue texture and robust smoky flavor.  Adding a source of humidity, such as a pan of simmering water, ensures the environment doesn’t become too arid and end up pulling moisture from the ribs.

Another point of note is to soak your desired wood chips for at least a half hour before hand to make them last longer and give off a more flavorful smoke.  Happy smoking!


ingredients:

Ribs

  • 2 large racks pork ribs

Sauce

  • 1 cup bourbon
  • 1 cup ketchup
  • 4 tbs apple cider vinegar
  • 2 tbs Worcestershire sauce 
  • 2 tbs spicy brown mustard
  • 3 tbs brown sugar
  • 1 tsp onion powder
  • 1 tsp garlic powder
  • 1/2 tsp crushed red pepper
  • 1/2 tsp black pepper

Wet Rub

  • 1/3 cup brown sugar
  • 1/3 cup paprika
  • 3 tbs kosher salt
  • 3 tbs black pepper
  • 1 tbs garlic powder
  • 1 tbs cayenne 
  • 1 tbs thyme (picked & chopped)
  • 1 tbs oregano (chopped)
  • 1/2 tbs crushed red pepper
  • 1/2 tbs chili powder
  • 1/2 tbs garlic powder
  • 1/2 cup beer 
  • 2 tbs apple cider vinegar 

preparation:

A proper smoke ring is a tell-tale sign of properly done barbecue 

A proper smoke ring is a tell-tale sign of properly done barbecue 

Mix all ingredients for the wet rub in a large mixing bowl and whisk to combine.  place your ribs meat side down on a cutting board and using a pairing knife or a small chef's knife score along the back of each rib to loosen the membrane.  Clean the membrane off the back as much as you can.  Line a sheet tray with a large piece of plastic wrap and place the ribs on top of the plastic.  Apply the wet rub liberally to both sides of the ribs and then wrap in the plastic wrap.  Place in the fridge for an hour or up to a day.  The longer the rub is allowed to sit on the ribs, the greater flavor it will impart and the more it will assist in the cooking process.

For the sauce, add the bourbon to a medium sized pot over med-high heat.  Once the bourbon starts to simmer, remove from heat and ignite using a long match or lighter to burn off the alcohol.  return the pot to the heat and allow the flames to die down.  It's important to always have a lid close by to cover the pot and smother the flame should the fire ever start to get out of control. 

When the flames die down reduce the heat to med-low and reduce the bourbon by half.  Add the remaining components and whisk to combine, reducing the heat to low.  Allow sauce to simmer until it coats a spoon, then remove from heat and allow it to cool.  

Once your ribs have sat and your sauce is prepared, light and configure your smoker.  The ideal temperature to keep these ribs at is 225, so once you are dialed in at that heat place the ribs meat side down on the grate and close the lid.  Continue to monitor the temperature, adjusting vents and adding coals and wood chips as needed to ensure the environment stays stable and consistent.  Half-way through the cooking time, flip the ribs over and coat them with the sauce.  Continue to add a coat of sauce to the ribs every 20 mins.  The ribs are done when the meat begins to pull away from the tips and the meat pulls apart in your fingers.  Allow the ribs to sit for 10-15 mins before cutting and serving.


Red Chile Braised Chicken Soft Tacos, with Pickled Red Onion & Grilled Corn Salad


Prep Time: 20 min    Cook Time: 2 hours    Serves: 4


Truly excellent tacos are one of the things that my wife and I miss most since leaving Los Angeles.  The hunt for the little hole-in-the-wall, family owned establishments that were so often the purveyors of said excellent tacos has yielded little fruit in my native nutmeg state.  Though flush with a truly staggering amount of world class pizza joints, the taco has eluded the culinary taste makers in Connecticut since forever.  So, as is so often necessary when pursuing your passions, I took matters in my own hands. 

Mexican food done properly requires a fair amount of coaxing of flavors and patience to develop the richness and complexity native to the cuisine.  This recipe takes about two hours to put together, but after your first bite you will know it was time well spent.  

Technique for this dish is fairly simple, requiring attention mostly during the searing of the chicken and sautéing the garlic and onion.  Proper heat and fat in the pan should ensure a good sear and excellent caramelization on the chicken; helping to develop the rich flavor required for this dish.


Preparation:

Pre-heat oven to 300 degrees.  Heat a large pan with the 2 tbls oil over med-high heat.  It is important that there is enough oil in the pan in order to effectively sear the chicken.  While the pan is warming, liberally season both sides of the chicken with the salt, pepper, red pepper, paprika, and chili powder.  When the oil shimmers the pan is hot enough for the chicken.  Sear the chicken on each side, remove from pan and hold to the side.  

Add the chopped garlic and onion, stirring with a wooden spoon to remove any brown bits from the bottom of the pan.  Saute over medium heat util the mixture is browned and the onion starts to turn translucent.  Poor in chicken stock to    de-glaze the pan.  Allow the stock to come up to a simmer before adding the chile sauce, and then the reserved chicken breast, making sure they are almost completely submerged in the sauce.  Cover the pan and place in preheated oven, and set a timer for two hours.

Ingredients:

Chicken

  • 2 lbs boneless, skinless chicken breast
  • 8 oz chicken stock
  • 2 8 oz cans red chile sauce 
  • 4 cloves garlic, finely chopped
  • 1 large yellow onion, diced
  • 2 tbls vegetable oil
  • 2 tsp salt
  • 2 tsp fresh ground black pepper
  • 2 tsp crushed red pepper
  • 2 tsp paprika 
  • 1 tsp chili powder
  • 1 package corn tortillas

Grilled Corn Salad

  • 2 ears large yellow sweet corn; un-shucked
  • 1 16 oz can black beans
  • 8 oz chopped cilantro
  • 2 tbl fresh lime juice
  • 6 oz jalapeno peppers; thinly sliced rings
  • 10 oz crumbled cotija or goat cheese

Pickled Red Onions

Red Chile Sauce

Red Chile Sauce

  • 1 lage red onion; sliced
  • 1 1/2 cups apple cider vinegar
  • 2 tsp salt
  • 2 tsp granulated sugar
  • 1/2 jalepeno pepper
  • 4 oz cilantro; whole stem and leaf
  • 3 oz coriander seeds
  • 2 oz fresh lime juice
Pickled Red Onions

Pickled Red Onions

While the chicken is cooking, warm your grill for the corn.  By leaving the outer leaves on and placing the corn on the upper warming rack, you can slowly steam it.  This technique ensures the corn is fully cooked while also allowing for a final char on the grill.   Simply place the corn on the upper rack in the grill and progressively peel off the leaves as they char.  Once all the leaves are off, char the corn directly on the grill over high heat.  Remove the corn and using a chef's knife, slice the kernels off and reserve in a medium sized bowl.  Drain the black beans in a colander and add to the corn.  Add the lime juice and chopped cilantro.  Season with salt and pepper and hold to the side.

For the pickled red onions, chop off the ends and cut in half, slicing the onion into thin half moons.  Place the onions in a large mason jar along with the whole cilantro, half jalapeno, and coriander seeds and hold to the side.  Pour the vinegar and lime juice in a small pot, adding the salt and sugar and heat over medium/low heat until the salt and sugar dissolve.  Pour the vinegar into the jar with the onions and allow them to sit for thirty mins before using.

To assemble, warm the tortillas either in the oven or in a skillet with a small amount of oil. Add the chicken and corn salad, topping with the cotija or goat cheese and garnishing with the jalapeno rings and pickled onions.

Recipe by David Ferguson