Family Meal

by Chef David Ferguson

PERSONAL CHEF SERVICES 

& PRIVATE EVENTS


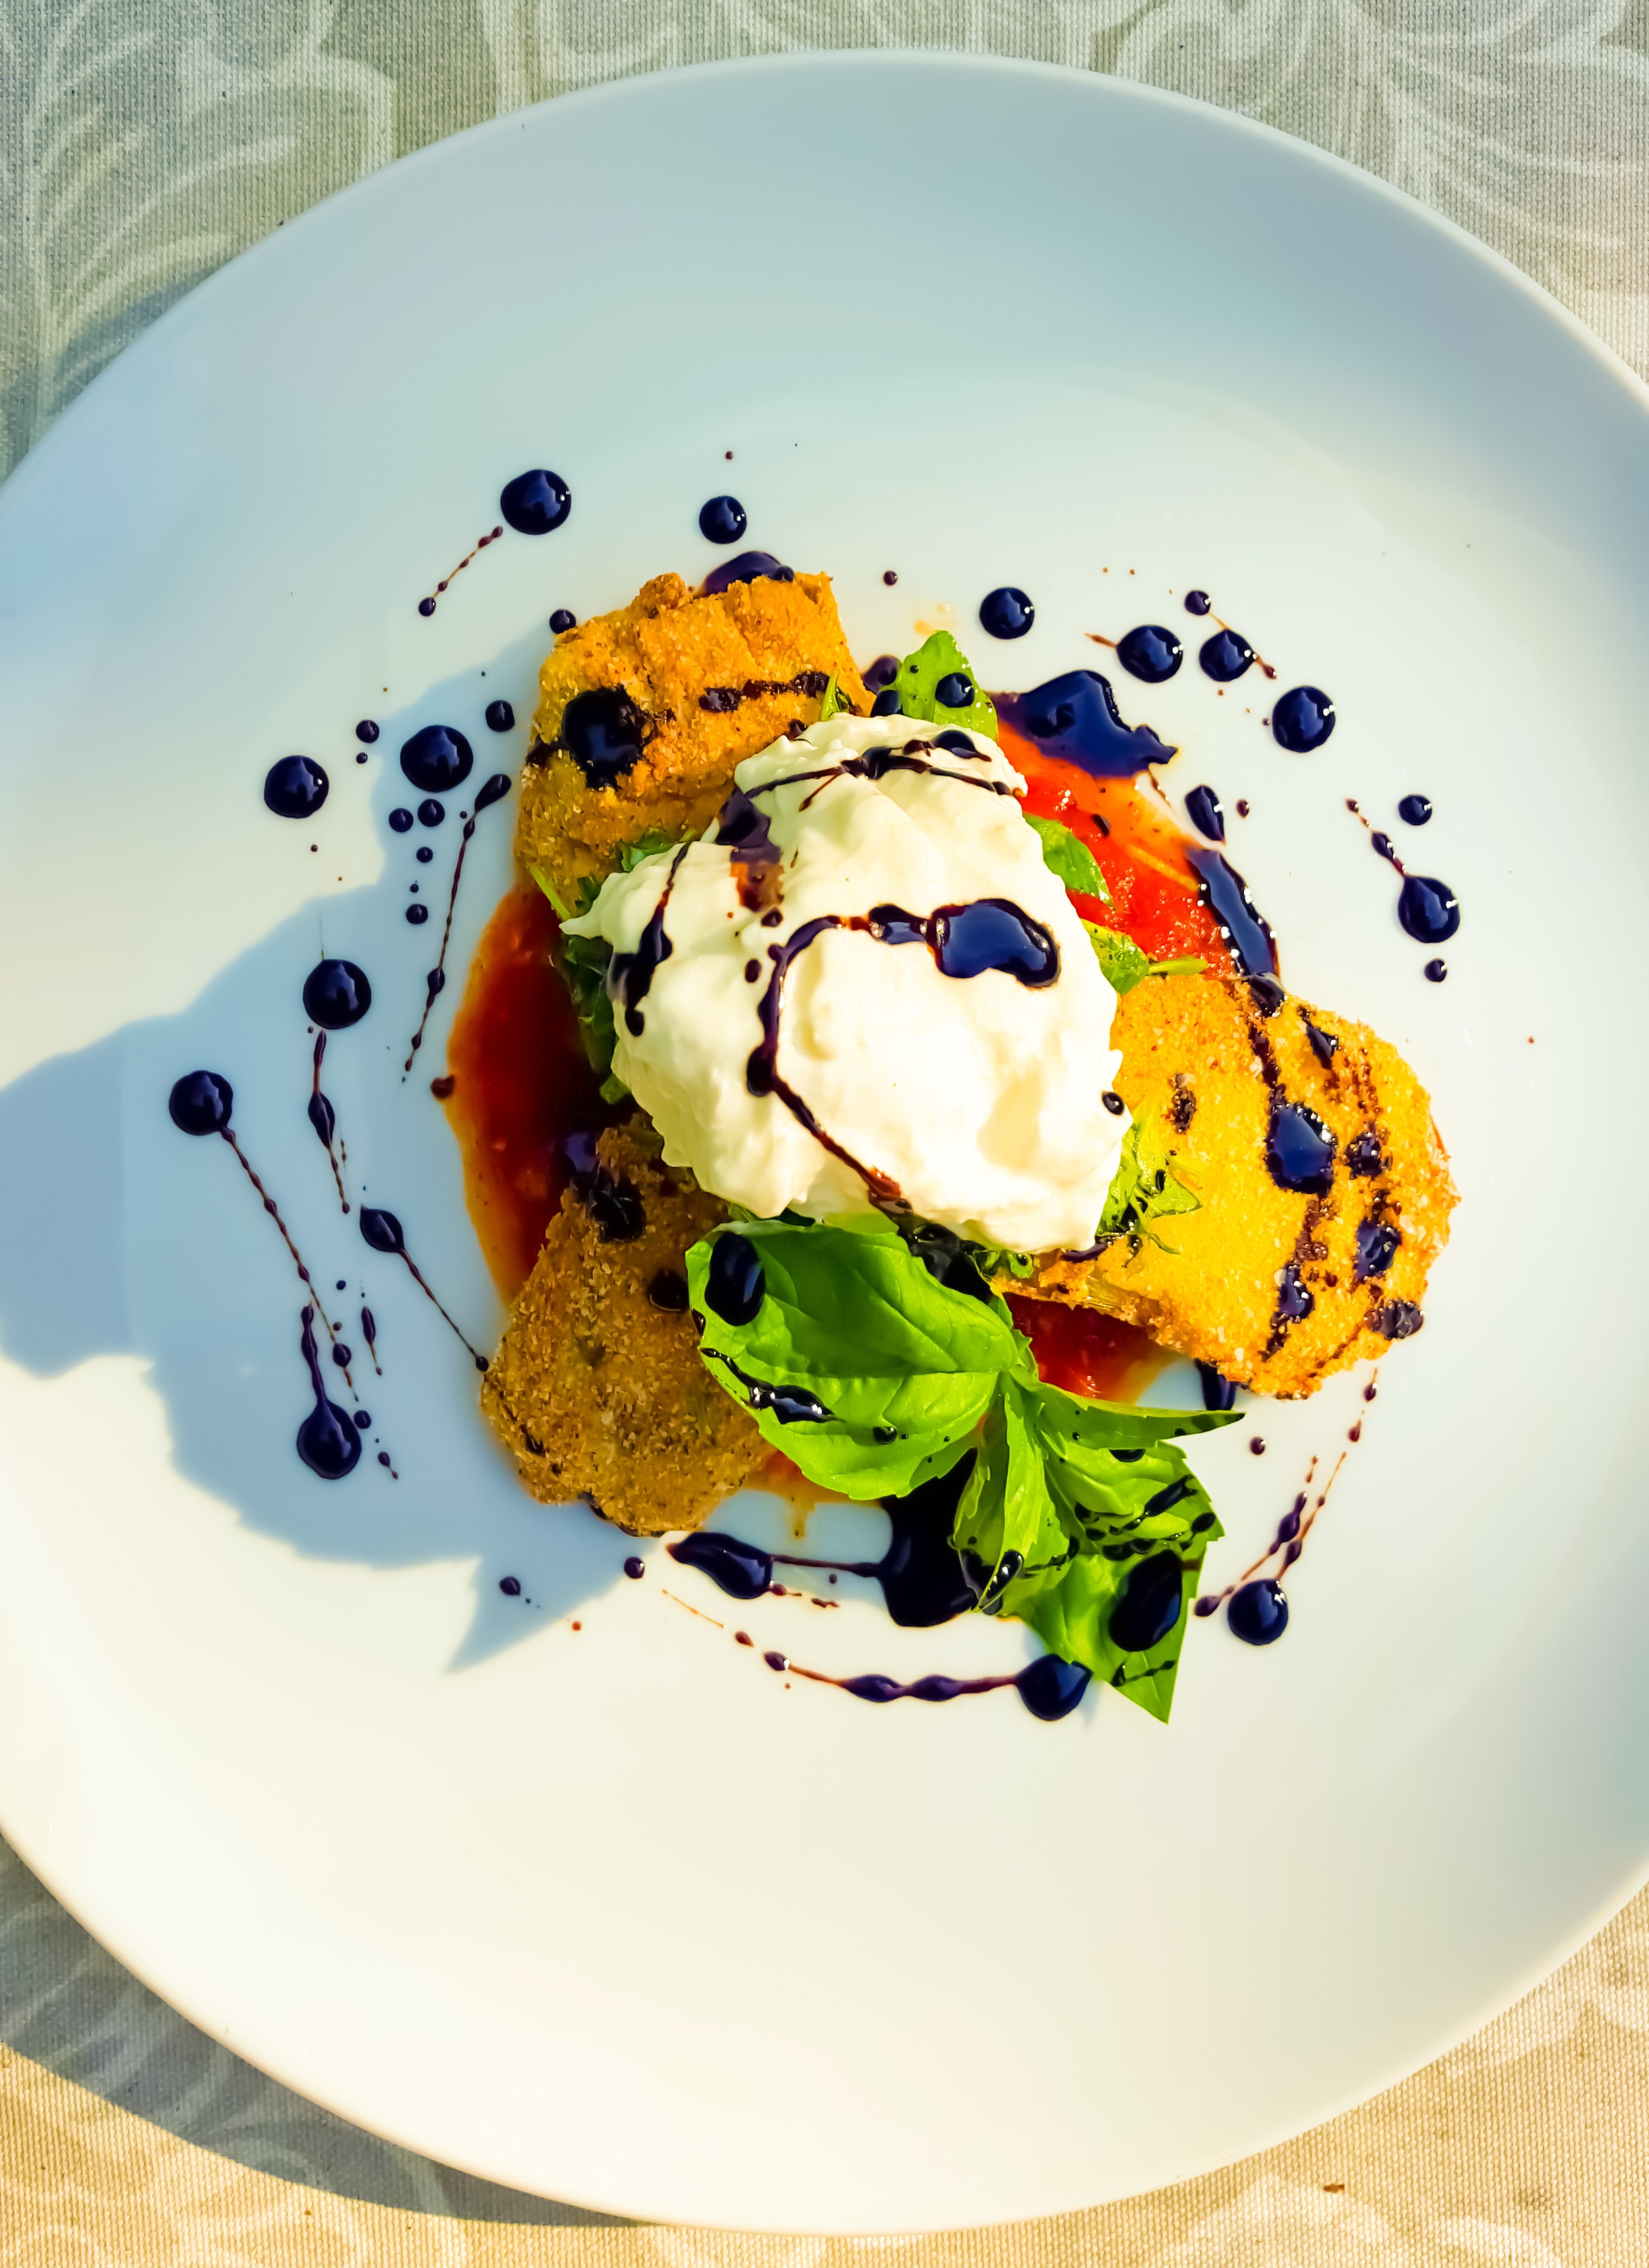
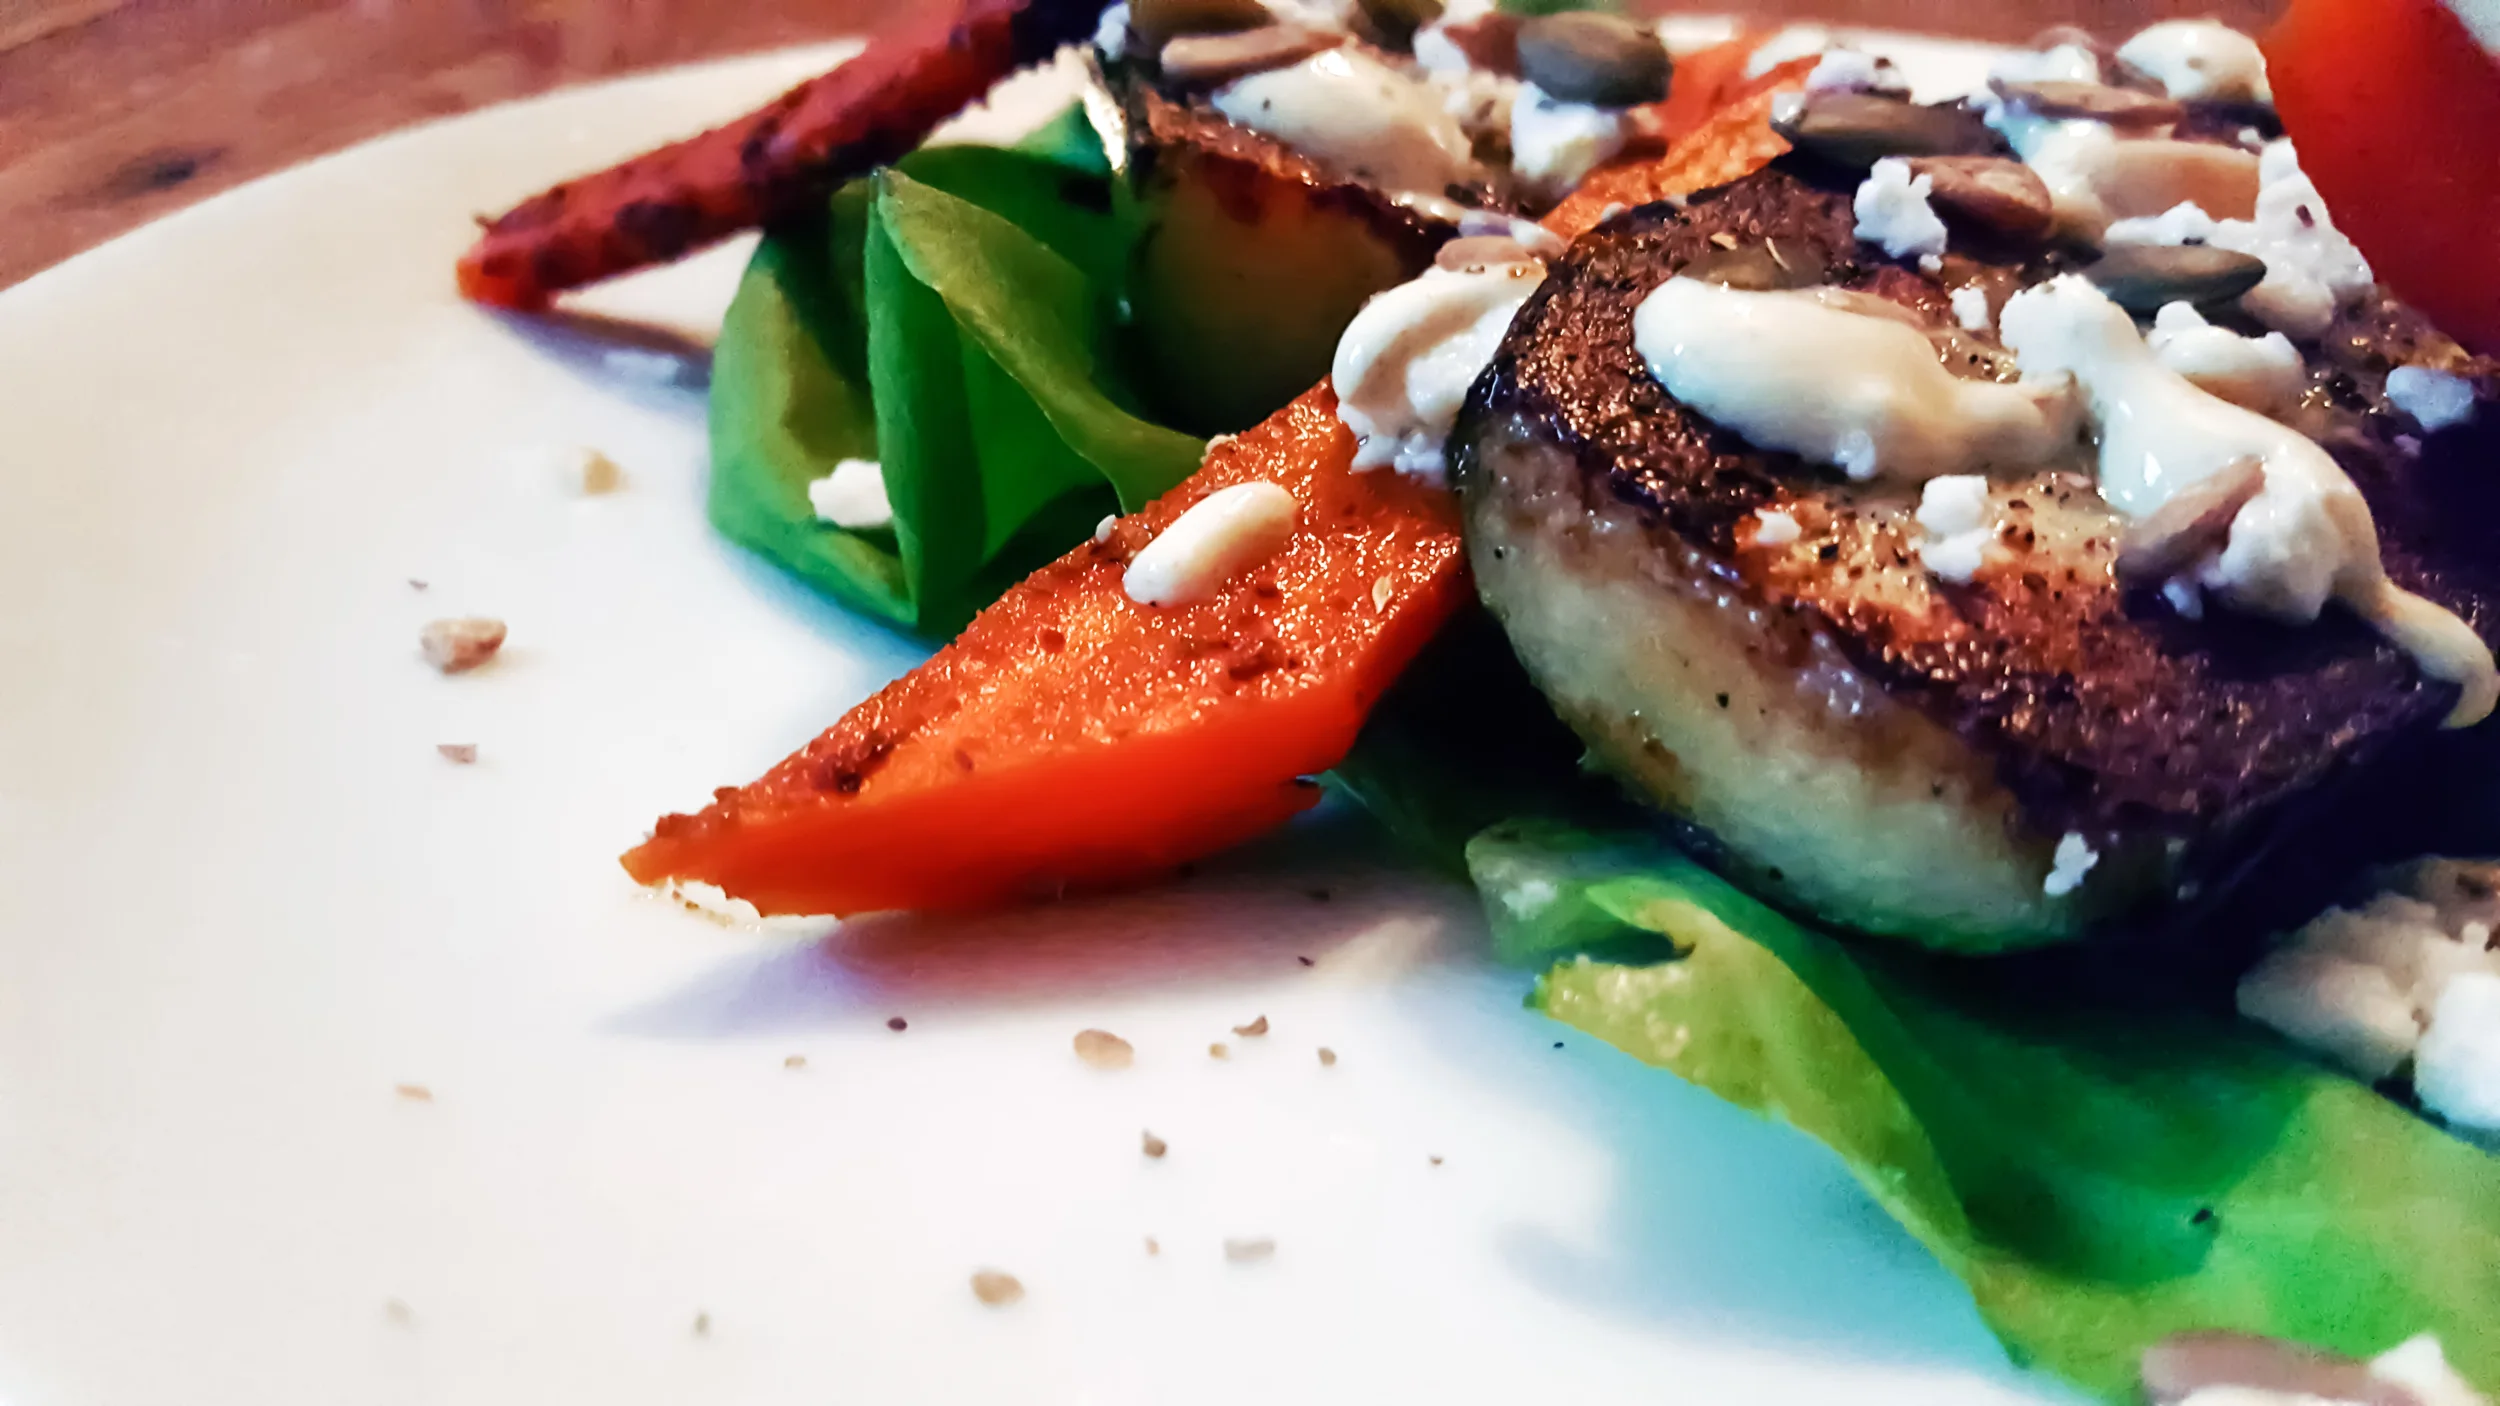
Seared Blackened Tuna, Pickled Shiitake Mushrooms, Ruby Grapefruit, Purple Potato Chip, Green Onion Soubise, & Ginger Bell Pepper Puree


Prep Time:  60 mins    Cook Time:  1 hour    Serves:  2


A spate of warmer than usual weather had me thinking outside of typical Winter fare.  The bright colors and flavors of this dish can warm up your kitchen no matter what the weather is like outside.  I made my own blackening spice with chili powder, paprika, salt, pepper, garlic powder, thyme, oregano, and cayenne.  However a store bought blend will do just as well.  Tuna can be cooked like steak, so a temperature range can be used.  I would suggest cooking the tuna quickly, just searing the outside in a very hot pan.  This keeps the texture and flavor you pay for in a nice piece of tuna, in tact.  

There are more than a few steps to this recipe, but don't be intimidated.  Completing each item before moving on to searing the tuna and plating is the easiest way to go about it.  

ingredients:

Tuna-

  • 1 lb fresh Ahi or higher grade Tuna; trimmed and cut into 2"x2"x4" logs
  • 1 tbsp paprika
  • 4 tsp dried thyme
  • 2 tsp garlic powder
  • 1 tbsp white sugar
  • 2 tsp salt
  • 1 1/2 tsp black pepper
  • 1 tsp cayenne pepper, or to taste
  • 1 tsp dried oregano
  • cilantro for garnish
  • grapefruit supremes for garnish

Mushrooms-

  • 1 cup cleaned shiitake mushrooms
  • 1 cup water
  • 1 3" piece of ginger; pealed and sliced
  • 1/4 cup fresh cilantro
  • 2 tbsp fresh lime juice
  • 1 cup rice wine vinegar
  • 1/3 cup granulated sugar
  • 3 tbsp kosher salt

Ginger Bell Pepper Puree-

  • 1 orange bell pepper
  • 1/2 cup carrots; sliced
  • 1 3" piece of ginger; peeled and sliced
  • 1 cup fresh grapefruit juice
  • salt to taste

Green Onion Soubise-

  • 1 large yellow onion; thinly sliced
  • 4 tbsp unsalted butter
  • 1 cup whole milk 
  • 1 large bunch fresh green onions
  • salt to taste

Purple Potato Chip-

  • 3 purple potatoes
  • 4 tbsp kosher salt
  • 2 cups water

Method:

Place a sauce pot over high heat with  the components for the pickled mushrooms (water, rice vinegar, sugar, salt, lime juice) and bring to a boil.  Meanwhile, place cleaned mushrooms, cilantro, and ginger in a medium sized mixing bowl.  When the mixture is boiling and the sugar has dissolved, pour the hot pickling bring over the mushrooms.  Set aside and let the mushrooms cool to room temperature.

Preheat your oven to 400 degrees.  Place your bell pepper in a saute pan or a small baking tray and let it roast in the oven until the skin begins to blister (approx. 20 mins). Place the pepper in a bowl and cover with a towel to cool, removing the skin and seeds once it is cool enough to handle.  Meanwhile, place the sliced carrots, peeled ginger, and grapefruit juice in small  sauce pan and bring to a simmer.  Simmer carrots and ginger until very tender, adding a tablespoon or so of water if the juice begins to evaporate.  Once tender, add the carrots, ginger, and cleaned bell pepper to a blender, reserving the poaching liquid.  With the blender running, add a tablespoon of the poaching liquid at a time to the solids until  a smooth puree forms.  Season with salt to taste then remove puree from the blender and set aside.

Add your sliced onion, butter, and milk to a sauce pot and set over medium heat.  Bring your pot up to a simmer and let cook until the onions become very, very tender (approx. 30 mins).  Strain out the onions, reserving the butter and milk.  Puree the onions in a blender with the whole, fresh green onions. Add the reserved milk and butter gradually until you reach the desired smooth and creamy texture.  Season with salt to taste then remove the soubise and set aside to cool.  

In another small pot, place potatoes, water, and salt over medium heat to simmer.  Poach potatoes until just tender, then remove from the water and let dry on paper towels or a wire rack.  When the potatoes have cooled enough to handle, slice into thin rounds.  Bake the sliced potatoes in the oven at 375 degrees until crisp (approx. 10 mins).  Once done, set aside to cool.

Mix together your seasoning in a shallow bowl.  Roll your trimmed tuna steaks in the seasoning blend, coating them liberally on all sides.  Place a saute pan over high heat and add 1-2 tbsp of vegetable oil.  When the pan is very hot and just starting to smoke, place your tuna steak in and sear for 30-45 seconds on each side.  When all four sides are seared, let the tuna rest for 2-3 minutes before slicing.  

Three cheese Mac with Aged Cheddar, Gruyere, and Shaved Parmesan


Prep Time:  20 mins   Cook Time:  30 mins    Serves:  2    


Sometimes you just want your food to give you a big hug.  This recipe does that with a perfect mix of a creamy cheese sauce and a crispy caramelized top.   There isn't anything complicated about mac and cheese, but there are some tricks to ensure you get the best results.  Chief among these is to start your cheese sauce with a bechamel, and be very liberal with the sauce when assembling.  The three cheeses I used are all rather sharp, which provides a robust flavor.  The Parmesan also browns nicely under the broiler.  Season your sauce well and don't skimp on the cheese and you'll have the best batch of mac n' cheese you've even made.  

ingredients:

  • 2 cups elbow pasta (or another small, hollow pasta like ditalini)
  • 4 tbsp unsalted butter
  • 4 tbsp all purpose flour
  • 1 1/2 + 1/2 cup 2% milk 
  • 1 cup shredded aged white cheddar+ 1/4 cup shredded extra sharp yellow cheddar
  • 1/2 + 1/3 cup shaved Parmesan
  • 1/2 cup shredded Gruyere    
  • salt to taste              

Method:

Place a large pot of heavily salted water over high heat.  Meanwhile, place a sauce pan over medium heat and melt butter, stirring with a wooden spoon.  When the butter is melted, whisk in the flour to form a roux, ensuring there are no lumps.  Cook the roux for 1-2 minutes over low heat, but do not let it begin to brown.  Gradually start adding the milk to the roux, 1-2 tablespoons at a time, whisking constantly.  The roux will absorb the milk and become very stiff at first.  Continue adding the 1 1/2 cup of milk until it is all full incorporated.  Begin adding the cheese gradually, letting it fully melt into the sauce before adding more.  If the sauce becomes too tight, add in some of the reserved 1/2 cup of milk util the desired texture is reached.  Remove the sauce from the heat and set aside.

Add in your pasta to the boiling water and cook until 80% done.  Strain the boiled pasta in a colander and rinse with cold water to halt the cooking process.  Add the pasta to the cheese sauce and heat through.  Portion the pasta and sauce into small cast iron vessels or other heat proof cook ware.  Sprinkle the yellow cheddar and remaining 1/3 cup shaved Parmesan liberally over the pasta and set in the oven under the broiler set to high.  Make sure the racks in your over are not too close to the broiler or the sauce will break.  Brown the pasta under the broiler until the cheese melts and a caramelized crust forms.  Remove from the oven and let cook 2-5 minutes before serving.  

Classic French Omelet, with Spinach, Feta, and Chives


Prep Time:  10 mins    Cook Time:  5 mins    Serves:  1


When you go for an interview at a lot of restaurants, they will ask you to make something that exemplifies some mastery of basic technique. The classic French omelet is one such dish. This morning I was feeling a bought of nostalgia in between hunger pangs so I dusted off the non stick pan and whipped this up.  

The key to a good omelet lies mostly in the consistency of the eggs and your technique once you add them to the pan.  Unlike scrambled eggs, where vigorous whisking is encouraged to incorporate more air and produce a fluffy texture, the aim here is for a dense silky custard in the omelet.  Whisk only until the yolks and whites are fully mixed together, and do not add any milk or half and half.  

Once your eggs are fully whisked, its time to get cooking.  The pan should be preheated over medium heat with about a tablespoon of butter.  As soon as you add the eggs you want to gently jostle the pan and keep the eggs from immediately  cooking.  This will form a custard and create the texture you want when you cut into your omelet.  At this point you may add your fillings (if any) and allow the edges of the omelet to begin to set.  Don't go crazy if you add fillings though, as too much will prevent you from making the crepe-like folds that create a French omelets distinctive form.

When the custard has just begun to set and the edges have begun to solidify, its time to remove the eggs from the heat.  Using a rubber spatula, loosen and gently lift the edges of the omelet up from the pan.  Using an underhand grip on the pan, roll one edge of the omelet over towards the middle while tilting the pan and sliding the omelet onto a plate.  You should be able to roll the omelet over onto itself and onto the plate.  This is a little tricky, and requires some practice.  Thankfully, a dozen eggs only costs a couple dollars.  Even if you botch the plating, the results will still be tasty.  Go practice and you'll be ready for brunch service in no time!

ingredients:

  • 2 large eggs
  • 1/4 cup crumbled feta
  • 1/3 cup fresh spinach
  • 1 tsp chives; finely chopped
  • 1 tbsp unsalted butter
  • salt to taste

method:

Crack two eggs in a medium mixing bowl and whisk until just combined.  Place a non stick pan over medium heat and add in a tablespoon of butter.  As the butter melts, make sure it evenly coats the bottom of the pan and up the sides as well.  When the butter has melted, add your eggs to the pan.  Immediately jostle the pan so the eggs do not set too quickly.  Roll the pan so the custard coats the whole pan evenly.  As the eggs begin to set, add in the feta and spinach.  Season with salt before you roll the side of the omelet with a rubber spatula and remove it from the pan.  Sprinkle with chives and a drizzle of melted butter.  

Rosemary, Thyme, & Fennel Crusted Rib Eye Roast with Horseradish Cream Sauce


Prep Time:  8 hrs    Cook Time:  4 hrs    Serves:  8-10


20161221_113925_edited.jpg

Nothing is more impressive on a Holiday table than a gorgeous roast, and Rib Eye is the King of roasts.  Now while the time table on this may seem intimidating, it's the oven that does most of the work for you.  I used a 7 lb roast for this recipe, with a cook time of four hours.  If you need a larger roast for your crowd at the table than this, I would suggest breaking it down into 2-3 rib sections so that your cook times line up.  

The day before you put your roast in the oven, season it heavily and place it uncovered in the fridge. This technique is called  a "dry brine", and it will achieve two things for you: It will infuse the meat with flavor, and it will draw out excess moisture so you get better caramelization.  Let the roast sit in the fridge for a minimum of eight, and up to 24 hours before cooking. Before you place the roast in the oven, let it come up to room temperature for two hours first.  The closer the roast is to room temp, the more evenly it will cook.  I would also suggest browning the roast at the end of cooking as opposed to the beginning.   This is the opposite of what most recipes will tell you.  Starting at a lower temperature and then raising to 500 or throwing on the broiler at the end though will avoid the tough ring of overcooked meat than can often result from a hard sear or browning at the start.  

ingredients:

Roast

  • 3/4 cup rosemary leaves
  • 3/4 cup thyme leaves
  • 3 tbsp fennel pollen
  • 1 6-bone standing beef rib-eye roast (10–13 pounds)
  • Kosher salt
  • Freshly ground pepper

Horseradish Cream

  • 1 1/2 cups crème fraîche or sour cream
  • 1/2 cup prepared white horseradish
  • 6 tbsp chopped fresh chives
  • 4 tsp fresh lemon juice

method:

Grind the rosemary and thyme leaves in a spice mill or with a mortar and pestle to a powder. Transfer the leaves to a small bowl and mix in with the  fennel pollen, salt, and ground pepper. 

Place the  roast fat side down on a cutting board with a long side facing you. Using long strokes, cut the roast into two 3-bone roasts. French the rib bones 1½" from tip of bones, if desired (this is strictly for presentation and will have no affect on the cooking of the roast). Score the fat cap in a crosshatch pattern, spacing cuts 1" apart.  This will help the fat fully render as the roast cooks. Coat the roast heavily with the rosemary mixture. Place the roasts fat cap up, on a rack set inside a roasting pan. Chill, uncovered, at least 8 hours and up to 1 day.

Place a rack in lower third of your oven and preheat to 225°. Roast meat, rotating pan once, until an instant-read thermometer inserted into the thickest part of roasts registers 125° for medium-rare, or 130° for medium; about 3 ½–4 hours. Remove from the oven and tent with foil.  Let the roasts rest 30 minutes.

Whisk all the ingredients for the horseradish sauce together in a mixing bowl and then season with salt and pepper.  Cover and chill in the fridge.

Meanwhile, move rack to the upper third of the  oven; increase oven temperature to 500°. Roast meat until deep brown and exterior is crisp, 8–10 minutes. It may be necessary to use the broiler if you oven does not go this high.  In this case, lower the rack in the oven and broil on high until the desired color and texture is reached. Serve roasts alongside horseradish cream sauce.  Happy Holidays!

Fried Green Tomatoes, Burrata, Reduced Balsamic & Fresh Basil, with Arrabbiata Sauce


Prep Time:  30 min    Cook Time:  20 min    Serves:  2


As we approach the end to another summer, there are still a few treats left in the season.  This pairing of the southern classic, fried green tomatoes, and a spicy arrabiata sauce is a perfect way to burn through the abundance of fruit showing up on the vines right now.   Add in some fresh basil and some reduced balsamic vinegar and you have a late summer recipe to send the season out in style.

Arrabbiata means angry in Italian, denoting the spiciness in this tomato based sauce.  Simmer the red pepper flakes and garlic together in olive oil before adding in your tomatoes.  This will allow the heat and favor to diffuse into the oil and into your finished sauce.  

Simmer the vinegar slowly over low heat to reduce. This will ensure you don’t over reduce or scorch the syrup.  Reducing the vinegar not only makes it more sauce like, it concentrates the flavor.  The sweetness in the vinegar is important as it counters the heat in the arrabbiata, and makes the dish more balanced as a whole.    


Ingredients:

  • 2 large green tomatoes (either roma or beefsteak); sliced
  • 8 oz burrata cheese
  • ½ cup fresh basil; chopped
  • ½ cup arugula; chopped
  • 2 large eggs; whisked
  • 1 cup flour
  • 1 cup cornmeal
  • 1½ cup balsamic vinegar
  • 1 cup vegetable oil
  • 2 tbsp olive oil
  • salt & pepper to taste

Arrabbiata Sauce

  • 4 large san marzano or roma tomatoes; chopped
  • 2 cloves garlic; minced
  • 1 tbsp red pepper flakes
  • 2 tbsp fresh basil; finely chopped
  • 2tbsp olive oil
  • salt & pepper to taste

Method:

Add olive oil, chopped garlic, and red pepper flakes to saute pan and simmer over medium/low heat.  Simmer for two-three minutes, stirring occasionally.  Add in your chopped tomatoes and raise the heat to medium, continuing to simmer for another 10 minutes.  Stir and break down the tomatoes using a wooden spoon before transferring to a food processor.  Pulse the sauce until it achieves a light chunky consistency.  Add in the fresh chopped basil then set aside.

Add the vinegar to a small sauce pot and bring to a simmer.  Drop the heat to low and reduce the vinegar to the consistency of a light syrup.  Remove vinegar from the heat, add to a small bowl and set to the side.   

In three separate bowls add your eggs, flour, and cornmeal.  Take the sliced green tomatoes and dredge them first in the flour, then in the eggs, and finally in cornmeal, before setting aside on a wire rack.  

In a high sided pot add the cup of vegetable oil and set over medium/high heat. The oil should reach approximately 300 degrees.  If you don’t have a thermometer to measure this, a good way to test the oil is to just have a spare piece or two to test fry.  When the oil is at the proper temperature, the tomatoes should turn a golden brown after about a minute on each side.  Remove the tomatoes from the oil with a slotted spoon and drain on a paper towel before seasoning with salt and pepper.  

Toss the remaining chopped basil, arugula, and olive oil together with some salt and pepper.  Plate a small amount of the arrabbiata sauce before placing your fried tomatoes on top.  Top the tomatoes with the salad of basil and arugula, then add the burrata on top and drizzle the balsamic syrup.

Ricotta Stuffed Squash Blossoms, Sweet Corn Pudding, with Cherry Tomatoes & Basil Pesto


Prep time:  30 mins.    Cook time:  10 mins.    Serves:  2


Late August brings with it the rewards of a whole summer’s worth of work in the garden.  The greatest of those rewards for me being squash blossoms.  While squash blossoms great fresh and tossed in a salad or in a pasta dish, I wanted to make the blossoms the star in this recipe.  By stuffing them with a ricotta and herb mixture and then lightly batter frying, these blossoms become a  fresh and satisfying appetizer or light entree.  

Squash blossoms are very delicate and have to be handled with care when stuffing with the ricotta.  Slice the blossom open vertically, from the base to the top of the flower.  It’s better to slightly under fill the blossoms so that you have enough room to fold over and close the incision.  I would also suggest letting the  blossoms set up in the fridge for 20 to 30 mins after filling before battering and frying so that the filling does not run out once they hit the oil.  

While you could deep fry the blossoms in a more neutral flavored oil like vegetable, shallow frying in a pan with olive oil works great here.  Leaving a small bit of stem at the base of the blossom allows you to dip them in the batter and gently lower into the oil.  Fry the blossoms for one to two minutes on each side until a light golden brown then flip before allowing them to drain on paper towels.  

Ingredients:

  • 8 cherry tomatoes; halved
  • basil leaves for garnish
  • ½ cup olive oil

Squash Blossoms-

  • 8 squash blossoms
  • 1 cup whole milk ricotta
  • 1 egg yolk
  • 2 tbsp fresh oregano; chopped
  • 2 tbsp fresh basil; chopped
  • salt & pepper to taste

Batter-

  • ¾ cup seltzer
  • ¼ cup yellow cornmeal
  • ¼ cup all purpose flour
  • salt & pepper to taste

Corn Pudding-

  • 1½ cup yellow sweet corn
  • 2 tbsp unsalted butter
  • ¾ cup light cream
  • 2 tbsp granulated sugar
  • 1-2 tbsp yellow cornmeal
  • salt & pepper to taste

Basil Pesto-

  • 1 cup basil leaves
  • 1 clove garlic
  • ¼ cup walnuts
  • ¼ cup parmigiano reggiano
  • 1 tbsp fresh lemon juice
  • ⅓ cup olive oil
  • salt & pepper to taste

Method:

In a mixing bowl combine the ricotta, egg yolk, chopped oregano, chopped basil, salt, and pepper.  Cut open the squash blossoms and gently fill the flowers with the ricotta mixture, then set aside in the fridge to set.

Add the butter and corn to a small pot and lightly saute.  When the corn has begun to cook, add in the cream, sugar, salt and pepper and cook down until the cream has reduced by roughly half.  Add the corn mix into a food processor and pulse until smooth.  Add the corn mix back to the pot and return to heat, adding in the cornmeal.  Stir the corn pudding, adding in more cream or cornmeal in necessary until you achieve a thick, smooth texture.  Set aside.

Add the basil, walnuts, lemon juice, cheese, garlic to a food processor.  With the motor running, drizzle in the olive oil and process until smooth.  Season with salt and pepper then set aside.  

In a bowl combine the seltzer, flour, cornmeal, salt, and pepper with a whisk until well mixed.  Add the olive oil to a saute pan and place over medium heat.  Once the oil is heated, dip the blossoms one by one in the batter and then add to the pan.  Work in small batches, frying the blossoms for 1-2 minutes on each side.  

Plate the corn pudding before staggering your squash blossoms out.  Garnish with the cherry tomatoes, basil leaves,  and pesto.  

Charred Cucumber Salad with Roasted Carrots, Pepitas, Herbed Feta, & Turmeric Crema


Prep Time:  20 mins    Cook Time:  10 mins    Serves:  2


While charring in a hot pan may not be the first treatment that comes to mind for cucumber, I promise you will be happy with the results.  Cucumbers are in the squash family, so cooking them this way really isn’t too far outside the norm.  Due to their especially high water content, cucumbers must be seared in a screaming hot pan or they will steam instead of char.  Cut the cucumber in half vertically and salt the exposed flesh before cooking to draw out excess water and pat dry before adding to the pan.  

Ingredients:

  • 1 persian hothouse cucumber; halved lengthwise

  • 4 carrots; halved lengthwise

  • 6-8 bibb lettuce leaves

  • ⅓ cup pepitas

  • ⅓ cup feta cheese

  • ½ cup sour cream

  • 2 tsp turmeric

  • 2 tsp fresh lemon juice

  • 2 tsp marjoram

  • Salt and pepper to taste

Method:

In a mixing bowl whisk together sour cream, lemon juice, salt, pepper, and marjoram.  Cover the crema and refrigerate until needed.  

Add a tablespoon of the olive oil to a large saute pan and place over high heat.  When the pan has become very hot and the oil begins to smoke, very carefully add the cucumbers cut side down.  Sear the cucumbers for approximately one minute then flip and lower the heat.  Continue to saute the cucumbers for another two minutes then remove from the pan and drain on paper towels.

Toss the carrots with the remaining tablespoon of olive oil then season with salt and pepper.  Cook the carrots in a saute pan over medium heat until fork tender, then set aside and drain on paper towels until ready to use.  

Plate the lettuce leaves then fan out the carrots and cucumbers on top.  Liberally add the crema  then garnish with the pepitas and feta.

Raspberry Sorbet, with Mango Cheesecake, Chambord Coulis, & Brûléed Mango


Prep Time:  1 hour    Cook Time:  45 mins    Serves 2


After an all too brief summer vacation it’s nice to come back to something sweet.  The creamy texture in this mango cheesecake and the vibrancy of the raspberry sorbet create a perfect summer dessert  and look beautiful on a plate together.  It is important to use fresh fruit for these recipes.  While frozen or canned substitutes would work, there is no replacing the intensity and depth of flavor you get when using fresh product.  And since it’s summer and both fresh mangoes and raspberries are readily available, you really have no excuse not to use fresh ingredients.  

There are a few different parts to this recipe.  However, since all the components require time to set in the fridge, you have the ability to focus on one task at a time.  Although  you could start early enough to get everything ready for dinner, I would suggest letting both the sorbet and cheesecake set over night in the fridge.

INGREDIENTS:

Sorbet

  • 4 6-ounce containers fresh raspberries
  • ½ cup honey
  • 4 cups water; divided
  • ¾ cup white sugar
  • ½ cup light corn syrup

Mango Cheesecake 

  • Filling-
    • 3 large ripe mangoes; peeled, pitted, coarsely chopped
    • 3 8-ounce packages cream cheese; room temperature
    • 1¼ cup sugar
    • 2 tsp vanilla extract
    • 4 large eggs
  • Crust-
    • 1¼ cups all purpose flour
    • ½ cup slivered blanched almonds
    • ¼ cup sugar
    • ¼ tsp salt
    • ½ cup (1 stick) chilled unsalted butter; cut into pieces
    • ¾ tsp almond extract
    • 2 tbsp ice water
  • Mango Topping-
    • 1 cup mango puree
    • 1 tbsp granulated sugar
    • 1 tbsp gelatin
    • 2 tbsp warm water

Chambord Coulis

  • 1 cup Chambord
  • ½ cup fresh raspberries

Mango Brûlée

  • ½ ripe mango; cut into thin slices
  • ¼ cup granulated sugar
  • ¼ cup ground cinnamon

METHOD:

Place raspberries in a food processor and process until smooth. Press the raspberry  puree through a fine sieve to remove any seeds. Next, whisk together pureed raspberries and honey in a large bowl and set aside.

Combine three cups of water, sugar, and corn syrup in a large saucepan and bring to a boil over high heat. Boil until the sugar is fully dissolved, approximately two minutes; do not stir. Stir the sugar mixture and the remaining one cup of water into the reserved raspberry puree.

Make an ice bath by filling a very large bowl with water and ice. Set the bowl of raspberry puree in the ice bath and whisk until cool. Pour the cooled puree into a 9”x 13” baking dish and cover by pressing a piece of plastic wrap against the surface of the puree.  Freeze overnight until solid.

For the cheesecake; Blend flour, almonds, sugar and salt in processor until nuts are finely ground. Add in butter and pulse until mixture resembles coarse meal. Mix in almond extract and enough water to form moist clumps. Knead dough briefly on work surface to combine before flattening into a disk. Wrap dough in plastic and refrigerate until firm before rolling; at least two hours.

Once the dough has cooled and set, preheat oven to 325°F. Lightly butter 9” diameter spring form pan with high sides. Press almond dough firmly onto bottom (not sides) of prepared pan. Bake until the crust is set, about 12 minutes. Cool completely while maintaining the oven temperature.

Puree mangoes in a food processor until smooth, yielding approximately three cups. Set aside two cups mango puree (reserve remaining puree for the topping). Beat cream cheese, sugar, and vanilla in a large bowl until smooth. Add eggs one at a time, beating well after each addition. Add two cups mango puree and beat until well blended. Pour filling over crust in pan.

Bake cake and setting the spring form pan into a larger baking dish filled with water.  It’s important the water level in the larger pan is filled to the same level as the cheesecake filling to ensure proper baking.  Bake until  set and the cake is puffed and golden around the edges (center may move very slightly when pan is gently shaken), about an hour and 25 minutes. Cool cake one hour.

Mix together together the tablespoon of gelatin and two tablespoons of warm water and stir to combine.  Whisk gelatin mixture into your reserved cup of mango puree along with a tablespoon of granulated sugar.  Place mango topping in fridge to cool and set at least one hour before pouring onto cheesecake and refrigerate uncovered overnight.

With the coulis simply combine the Chambord liqueur and fresh raspberries in a small saucepan and set over medium heat. Ignite the Chambord to burn off the alcohol and allow to simmer until reduced by at least half.  You are looking for a thin syrup-like consistency that should easily coat a spoon.  Remove the mixture from the heat and puree in a food processor until smooth.  Pass the puree through a mesh sieve to remove any seeds and cool.  

Finally, the for the brûléed mango topping, sprinkle the granulated sugar and ground cinnamon heavily over the reserved mango slices.  Using a food torch, caramelize the sugar and cinnamon mixture on the mango slices.  Allow the slices to cool completely before slicing into strips and using to top cheesecake slices.


Ranier Cherries, Endive, Hazelnut Butter, with Goat Cheese, Black Pepper Bacon, and Cherry Vinaigrette


Prep Time:  30 mins.    Cook Time:  10 mins.    Serves:  2


Summer makes cooking very easy as it supplies us with a glut of beautiful and delicious ingredients to use.  At the top of both those categories are Ranier cherries.  Super sweet, with golden flesh and a bright red blush, you could do very well with just placing them in a bowl and letting your guests go at it.  For those interested in a slightly more elaborate treatment though, this salad balances the Ranier’s sweet flavor with the bitterness of endive,  smoky black pepper bacon, and creamy hazelnut butter.

For this recipe, it is recommended to use thick cut bacon.  Thinner cuts won’t break down properly and you’ll end up with bacon bits instead of the nice crispy lardons the recipe calls for.  Using a thick cut, and cutting the bacon into a small dice before rendering slowly will get you the best results.  Cook the bacon over low heat very slowly to cook all the fat out, then drain on a paper towel lined plate.  Reserve 3 tbsp of the bacon fat for your vinaigrette.

Toss the hazelnuts in olive oil and salt before roasting the oven, then cool. To remove any skins from the hazelnuts, simply dampen a towel and clean the skins off after roasting.  It's important to let them cool after roasting them in the oven.  Placing them directly in the food processor while still hot will cause the hazelnuts and oil to separate and prevent the “butter” from coming together.  If this happens, or if you accidentally add too much oil, add in a tbsp or 2 of cold water to bring everything back together and smooth out the texture.   You want to shoot for a very creamy and easily spreadable consistency.

INGREDIENTS:

  • 2 cups Ranier cherries; pitted and halved
  • 3 strips thick cut bacon; diced
  • 1 large endive spear; cleaned  and halved with leaves separated
  • 1 cup mache greens
  • ½ cup crumbled goat cheese

Hazelnut Butter

  • 1 cup hazelnuts
  • 5+1 tbsp olive oil
  • 2 tbsp honey
  • 2 tsp salt
  • 2 tsp vanilla extract
  • 1 tsp cold water (optional)

Cherry Vinaigrette

  • 1 cup Rainier cherries; pitted and halved
  • 1 tbsp champagne vinegar
  • 3 tbsp reserved bacon fat
  • 1 tbsp chopped thyme

METHOD:

Preheat your oven to 375°.  Toss the hazelnuts in a tbsp of olive oil with salt to season before transferring to a lined sheet tray and placing in your preheated oven.  Roast the hazelnuts for 12-15 minutes until golden brown.  Transfer the nuts to a paper towel lined plate and place in the fridge to cool.  Once cool, place the nuts, honey, salt, and vanilla extract into a food processor.  With the motor running, slowly start to drizzle in the remaining 5 tbsp of olive oil and process until very smooth and creamy.  

Meanwhile, place a saute pan over medium-low heat and add in your bacon.  Render the bacon slowly until very crisp then transfer to a paper towel lined plate to drain.

In a food processor add the cup of pitted cherries along with the champagne vinegar and chopped thyme.  With the motor running, add the reserved bacon fat a tbsp at a time.  Transfer the vinaigrette to a small bowl and chill.  

To assemble, run a long streak of the hazelnut butter across the plate before adding you endive leaves, mache, and cherries.  Fill the endive leaves like cups with the cherries, goat cheese, and bacon, before liberally adding dollops of the dressing around the plate.  

Red Pepper Marinated Marinated Shrimp, Charred Heirloom Cherry Tomatoes, Radish, Red Onion, & Avocado Cream


Prep Time: 20 mins.    Cook Time:  30 mins.    Serves:  2


This recipe is a great light appetizer for your next outdoor get together.  The light heat from the crushed red pepper on the shrimp is balanced out by the refreshing flavors in the avocado cream.  The char on the tomatoes also gives them a nice smoky flavor that lends some depth.

When purchasing your shrimp at the store for this recipe remember; size matters.  Shrimp are sold by the pound, and are labeled by an approximation of how many shrimp (shell included) are in that pound.  16/20 shrimp for example (the kind called for in this recipe) contain between 16-20 shrimp per pound.  You can of course get larger shrimp should you desire, but smaller wouldn’t lend themselves well to this application.

Marinate the shrimp in garlic, crushed red pepper, basil, and olive oil for at least 30 minutes before sauteing, this will ensure they have absorbed enough flavor.  For the avocado cream, make sure to select ripe avocados that are still a nice bright green.  Under ripe avocados can be placed in a paper bag on the counter to speed the ripening a little.  

Ingredients:

Shrimp

  • 8 raw 16/20 shrimp; shelled and cleaned
  • ½ cup heirloom cherry tomatoes; halved
  • 2 radish; shaved
  • ⅓ cup red onion; shaved
  • 2 tbsp crushed red pepper
  • 2 clove garlic; finely chopped
  • 2 tbsp basil; finely chopped
  • 2 tbsp olive oil
  • Salt & pepper to taste

Avocado Cream

  • 2 ripe avocados; pitted, peeled
  • ½  cup sour cream
  • 2 tbsp apple cider vinegar
  • 2 tbsp olive oil
  • 2 tbsp basil; finely chopped
  • Salt & pepper to taste

Method:

Place a large saute pan over medium heat and add marinated shrimp.  Cook the shrimp, tossing occasionally, until the shrimp are bright red and cooked through (approx. 10 mins).  Place shrimp on a paper towel lined plate and reserve.

Process avocados, sour cream, vinegar, oil, 2 tablespoons basil in a food processor until mixture is very smooth, light, and thick. Season with salt.

For the tomatoes; place the halved tomatoes cut side down on a sheet tray.  Using a butane food torch, char the skins of the tomatoes.  If you don’t have a torch, you can also use a heavy skillet.  Heat the skillet over high heat until smoking, then add the tomatoes skin side down until they become charred.  

Plate your avocado cream before stacking your shrimp and garnishing with the charred tomatoes, radish, and shaved onion.


Pan Roasted Halibut, with Patti Pan Squash, Fava Beans, Shaved Purple Asparagus, Micro Greens, and Chive Oil


Prep Time:  20 min.    Cook Time:  20 min.  Serves:  2


The great thing about fresh seafood is that it reflects the seasons and allows the perfect accompaniment to seasonal vegetables. Halibut s tender, flavorful, and a great partner for the squash and fava beans in this recipe.  Though it is a bit pricier than some of the other fish in the seafood case, it’s well worth it.  Halibut is served with the skin removed so if you are not comfortable enough removing the skin yourself make sure to ask your seafood provider to do it for you.  

If you have a hard time tracking down the squash and fava beans, check your local farm market.  Bishop’s in Guilford is currently carrying  both, as well as the beautiful micro greens for the salad in this recipe.  When cooking the squash, beans and asparagus, use a small amount of oil.  When the begin to soften and become tender, add a tbsp or so of water or stock and toss in a pat of butter.  This should provide a light sauce and help the ingredients come together a little more.  

Chive oil is a great simple dressing for salads and is a breeze to make.  Simply grab a handful of fresh chives and throw them in the blender with a cup of olive oil and blend on high.  The vibrant color is matched by the bright flavor.  Feel free to dress is up with a squeeze of fresh lemon juice and a pinch of salt as well.  

Ingredients:

20160523_171320 (1).jpg
  • Two 6 oz  halibut fillets; skin off
  • 1 cup patti pan squash; quartered
  • ½ cup fava beans; shelled
  • 3 stalks purple asparagus; shaved with vegetable peeler
  • 1 tbsp parsley; finely chopped
  • 1 tbsp basil; finely chopped
  • ⅓ cup mache greens; picked
  • ⅓ cup micro greens
  • ½ cup fresh chives
  • 1 cup extra virgin olive oil
  • 1 tbsp fresh lemon juice
  • 1 clove garlic; minced
  • ½ shallot, finely chopped
  • 2 tbsp vegetable oil
  • 1 tbsp unsalted butter
  • 1 tbsp water or vegetable stock
  • Salt and pepper to taste


Method:

Season halibut liberally on both sides with salt and pepper and set aside.  Add your chives and olive oil along with fresh lemon juice and a pinch of salt to a blender and set to high until the chives are completely emulsified into the oil.  Set aside

Set a large pan over medium heat and add 1 tbsp of vegetable oil.  Add in your chopped shallot and garlic and saute until fragrant before adding your squash and fava beans to the pan.  Continue to cook, tossing occasionally, until the squash and beans have softened.  At this point, add in your asparagus along with the tbsp of stock and butter.  Toss everything together until a light sauce begins to form.  Add in the chopped parsley and basil and season with salt and pepper.

Meanwhile, set another pan over high heat and add the remaining tbsp of vegetable oil. Once the pan is very hot and smoke starts to lightly rise from the pan, carefully add in the fish.  Slowly lower each piece into the pan away from you so no hot oil splashes back.  Slightly lower the heat and cook the fish until you can see browning at the edges.  Gently look to see if a good sear has formed before flipping the fish over and cooking only briefly (30 seconds to a minute).  Remove the fish from the pan and allow to briefly drain on a paper towel.  Dress your greens in a small bowl with the reserved chive oil and season lightly with salt and pepper before serving over the fish.  

Watermelon Crab Salad with Jalapeño, Cherry Tomatoes, Mache, Mint, and Lime Vinaigrette


Prep Time:  20 mins    Cook Time:  0 mins    Serves:  2


Summer has come on strong, making the idea of turning on the oven and making the kitchen even hotter very unappealing.  This crab salad will keep you and the kitchen cool on a warm evening.  Use lump crab meat here, or anytime you use crab really.  Claw meat isn’t as tender and has a much stronger flavor that most find unpleasant.  

Jalapeño is low on the list of the world’s hottest peppers, but it can still be too spicy for some.  To help with this, wear gloves and then remove the seeds and veins.  Capsaicin, the active ingredient in peppers that gives them their heat, is mostly contained in the seeds and veins.  Make sure you wear gloves for this though, as capsaicin can remain on your hands even after a thorough washing and any contact with your face will burn quite a bit.  

Mache greens are a small tender green available at most farm markets.  They are soft in texture with a nutty flavor and beautiful dark green color.  They usually come with the root bundle still attached and a lot comes in a package. If you have a few extra plant pots hanging around, plant whatever you don’t use to come back to later.  They do well in mixed sun and loose rich soil.

20160531_170108.jpg

Ingredients:

  • 1 cup lump crab meat
  • 2 cups watermelon; cut into 1” cubes
  • ½ cucumber; sliced into wide strips on a mandolin
  • 1 cup yellow cherry tomatoes; halved
  • 1 jalapeño; veined, seeded, and sliced on a mandolin
  • 1 cup mache greens
  • ⅓ cup mint leaves
  • ⅓ cup basil leaves
  • ¼ cup lime zest
  • ¼ cup fresh lime juice
  • ¾ cup extra virgin olive oil
  • Salt and pepper to taste

Method:

Add lime juice to a blender and slowly drizzle in olive oil with the motor running. Season with salt and pepper to taste then set aside.

Toss mache greens, basil, and mint lightly in lime dressing.  Plate your watermelon, tomatoes, and cucumber before adding your dressed greens.  Lightly dress the crab meat and plate amongst the rest of your salad.  Garnish with shaved jalapeño and lime zest then season lightly with salt and pepper.


Grass Fed Burger with Aged Cheddar, Caramelized Onion, Spinach, Dijonaise, & Fried Egg on Toasted Brioche


Prep time:  10 mins    Cook Time:  30 min    Serves: 4


20160502_162414 (2).jpg


After far too much rain, it’s time to get back outside and enjoy some nicer weather.  To that end, you can’t beat a great hamburger off the grill.  Like all recipes, a hamburger is a sum of it’s parts.   If you invest extra time and effort  in some basic technique and splurge on some more indulgent ingredients, you will be rewarded with a superior burger.  

Hamburgers are usually made from ground chuck with a certain blend of lean meat and fat.  This blend is represented in a proportion, usually printed on the package. The higher the fat percentage, the more flavor the hamburger is going to have. For this recipe, I would recommend an 80/20 blend of lean to fat.  This is the typical blend most restaurants use and it provides great flavor.  You could of course use a leaner blend like a 90/10, if you are attempting to get into beach shape

Picking a good cheese to compliment the rest of your ingredients is important, and here you will see the benefit of spending a little extra cash.  A sharp aged cheddar adds a nuttiness and a depth of flavor that will elevate everything else.  

Caramelized onions can’t be rushed, otherwise you are just searing them.  Low heat and time are the only way to go. Slice the onions about an ⅛ of an inch thick, this will help to keep them from burning after so much time on heat.  You should start the onions in a cold pan over low heat, stirring occasionally, and deglazing the pan with water, stock,  or even beer.  The onions will absorb any liquid you put into the pan and add even more flavor. The longer you cook the onions, the more the inherent sweetness will come out.  

A fried egg makes everything better.  Hamburger are no exception.  I would suggest a sunny side up or over easy egg, just make sure you have plenty of napkins.

20160502_162857.jpg

Ingredients:

  • 1 lb 80/20 grass fed ground beef; 4 ¼  lb patties
  • 8 oz aged extra sharp cheddar cheese; sliced
  • 1 large yellow onion; sliced ⅛” thick
  • 1 large beefsteak tomato; sliced
  • 2 cups baby spinach
  • ¼ cup mayo
  • ⅓ cup dijon mustard
  • 4 large eggs
  • 4 brioche buns
  • 2 tbsp butter
  • 2 tbsp vegetable oil
  • 2 tbsp olive oil

Method:

Preheat grill on high heat.  Season hamburgers liberally with salt and pepper and set aside.  Put sliced onions in a large saute pan with vegetable oil and set over low to medium low heat.  Allow onions to cook and slowly pick up color.  When the onions begin to stick to the pan, deglaze with a tbsp or two of liquid (any liquid will work, water, stock, beer, etc…) and continue to let onions cook.  Cook onions until they are a very soft and a deep golden brown.

Whisk together mayo and Dijon mustard for Dijonaise in a mixing bowl, then set aside

Push a small dent into the middle of each patty.  While this may seem odd, it prevents the hamburgers from swelling in the middle as they cook.  Cook the hamburgers for 4-5 minutes before flipping.  Once flipped, dress the hamburger first with tomato, then the caramelized onions, then with the aged cheddar.  Melting the cheese over the tomato and onions will help keep them toppings in place. Grill burgers until the cheese has melted and allow to rest while you finish the rest of your preparations.

Melt butter in a large saute pan and toast the brioche buns over medium heat on both sides.  Set aside and then return the pan to medium-high heat with the 2 tbsp olive oil.  Once the pan is hot, fry your eggs one or two at a time, whatever you are comfortable working with.  Season the eggs with salt and pepper before assembling your burger.  


Dress the top and bottom bun with the Dijonaise before adding your burger, then topping with fried egg and spinach.

Balsamic Macerated Strawberry Shortcake, with Thai Basil


Prep time:  40 mins    Cook time:  20 mins    Serves:  8


Using both sweetened and raw strawberries gives this classic dessert great flavor without being too sweet.  Maceration is a technique to sweeten  and soften fruit, as well as add flavor, without using heat.  This preserves flavor, and allows for greater expression of the ingredients.  Traditionally this technique is done by just letting the fruit sit in sugar, but by adding a couple tablespoons of balsamic vinegar and some chopped Thai basil, other flavors can be introduced to the fruit.

When making the biscuits, work the dough by hand.  As any self respecting southerner will tell you, overworking biscuit batter will make them tougher.  The more you work the batter, the glutens will develop, and the worse off you’ll be.  Finish the batter on a cutting board and fold until the ingredients just come together.  

Thai basil has a slightly sweeter profile, which is why I chose it over traditional basil.  If you can’t find it, regular basil would suffice, as would mint.  I would also recommend whipping the cream by hand for improved texture.  If you aren't in the mood for the arm workout though, and electric mixer will do fine, just avoid the stuff in a can.  

INGREDIENTS:

Biscuits

  • ¼ cup sugar
  • 1 tbsp baking powder
  • ½ tsp kosher salt
  • 2 cups all-purpose flour, plus more for surface
  • 6 tbsp (¾ stick) chilled unsalted butter, cut into pieces
  • 1 cup heavy cream
  • 1 large egg, beaten to blend

Berries & Whipped Cream

  • 1 lb fresh strawberries; hulled and quartered
  • ½ lb fresh strawberries; rough chopped
  • 2 tbsp balsamic vinegar
  • 4 tbsp sugar; divided
  • ¼ cup thai basil; chopped and divided
  • 2 cups heavy cream
  • 2 tsp vanilla extract

Method:

Preheat oven to 400°.  In a large mixing bowl, whisk sugar, baking powder, salt, and two cups of flour.  Using your fingers, work in the butter until the the batter becomes the texture of coarse meal with a few small pieces of butter remaining. Add in the cream and mix until the dough just comes together.  At this point, the dough will be sticky.

20160425_163108.jpg


Turn out your dough onto a lightly floured cutting board or surface and pat into a 12x4” rectangle about ¾” thick. Cut out rounds with a 2½” biscuit cutter, re-rolling the scraps as needed to make 8 rounds. Transfer rounds to a parchment-lined baking sheet and bake until tops are golden brown and shortcakes are cooked through about 15–20 minutes.

While your shortcakes are cooking, take 1lb of  your strawberries and add to a mixing bowl with 2 tbsp of sugar and balsamic vinegar.  Toss strawberries,  vinegar,  and sugar together, then add in half of your chopped basil and let sit 20-30 minutes.  

Whisk heavy cream, reserved sugar and vanilla extract together in a mixing bowl by hand until peaks form.   Set whipped cream aside.

Peel layers of biscuits apart and layer macerated strawberries and whipped cream.  Top with more whipped cream and garnish with fresh rough chopped berries and reserved basil.


Grilled Plums, Burrata, Baby Arugula, Shaved Almonds, and Vanilla-Honey Vinaigrette with Reduced Balsamic


Prep Time:  10 mins    Cook Time:  25 mins    Serves:  2


For the uninitiated, burrata is a cream filled mozzarella cheese.  Burrata is a wonderful, fresh ingredient on it’s own, that is exceptional with just some bread and a drizzle of olive oil and salt.  In this salad though, it really stands out with it’s heavenly texture and indulgent creaminess.  To serve; slice each piece in half, exposing the filling. Gently turn each half inside out and plate.  Serving the cheese this way will enable you to cut it with a fork without chasing it all over the plate.

I make a version of this salad in mid to late summer with peaches.  Since it is still April though I used red plums, which are an excellent substitute.  Make sure to heat the grill for at least ten minutes before starting your plums and to clean the grill well with an oiled cloth.  This will ensure high heat and a clean surface so you get proper caramelization on the fruit.  

Reduced balsamic is possibly my favorite condiment.  It’s great on everything from salads to ice cream.  And it’s simple to make.  Simply simmer balsamic vinegar over medium-low heat until it achieves the consistency of a light syrup.  Use a small pot and stir often with a rubber spatula.  Remember the vinegar will thicken more once it cools so do not over reduce or you will get something more akin to molasses in consistency.  If this happens simply whisk in a teaspoon or so of cold water to thin the syrup back out.  

Ingredients:

  • 2 red plums; halved and quartered
  • 16 oz fresh burrata; halved
  • 16 oz baby arugula
  • ⅓ cup fresh basil; chopped
  • ⅓ cup fresh mint; whole leaf
  • 2 tbsp fresh mint; chopped
  • ⅓ cup shaved almonds
  • 2 tbsp honey
  • ¼ cup fresh lemon juice
  • ¾ cup + ⅓ cup olive oil
  • 1 tsp vanilla extract
  • 1 cup balsamic vinegar; reduced
  • Salt to taste

Method:

Pour balsamic into a small sauce pot and set over medium low heat.  Simmer balsamic, stirring often, until reduced to a light syrup.  Remove  the pan from heat and let the reduced balsamic cool.  

Preheat your grill with burners on high.  Toss plums in ⅓ cup olive oil so they are well covered.  Place your plums on the grill evenly spaced.  Grill plums 3-4 mins on each side, looking for good grill marks on each side before flipping.  Let plums cool on a wire rack.

In a medium mixing bowl, add in lemon juice, honey, and vanilla extract.  Whisk ingredients until they are well mixed.  Gradually drizzle in olive oil while whisking, then add chopped mint and season lightly with salt to taste.  

In a large mixing bowl, toss together baby arugula, basil, mint, and almonds.  Dress salad before serving on top on plums and burrata, finishing with a drizzle of reduced balsamic.


Skirt Steak, Arugula Salad, Queso Blanco, Red Pepper Coulis, & Chimichurri


Prep Time:  20 mins.    Cook Time:  12 mins.   Serves:  2


Skirt steak is a cut more prized for flavor than tenderness.   Fatter than filet with slightly more steps in preparation, it is not the usual choice for home cooks.  However, it is a great choice to match with the bitter, peppery arugula greens, and the sweetness of roasted bell peppers.

Skirt steak can come with a tough membrane that needs to be removed before cooking.  You can request that your local butcher remove it or you can remove it yourself at home.  If not cooked properly skirt steak can be tough.  A quick pan sear to medium rare or medium is the preferred technique.  Make sure to slice against the grain, as with most steaks, to maximize tenderness.  

I used baby arugula in the salad as I think it has better flavor than the more mature greens.  The only drawback to this is that baby arugula can be a bit stemmy.  While definitely a labor of love, removing the stem from the leaves will give you a nicer product.  


Ingredients:

  • 1 lb skirt steak
  • 1 large red bell pepper
  • 1 cup baby arugula; stems removed
  • ⅓ cup sweet corn
  • ¼ cup crumbled queso blanco
  • 1 tbsp crushed red pepper flakes
  • 1 tbsp dried oregano
  • 1 tbsp dried basil
  • 1 tbsp dried thyme
  • 2 tbsp fresh parsley
  • 2 tbsp fresh lime juice
  • 1 tsp sherry vinegar
  • 3 cloves garlic;  chopped and divided
  • ½ shallot; chopped fine
  • ½ shallot; sliced thin into rings
  • ¼ cup + 1 tbsp olive oil; divided
  • 2 tsp vegetable oil
  • Salt and pepper to taste

Method:

Preheat oven to 450 degrees.  Place red pepper directly on oven rack and cook 10-15 mins until skin begins to char.  Place pepper in a mixing bowl and cover with a towel.  Set aside.

Place a saute pan over medium heat and add in 1 tbsp olive oil along with chopped shallot and 1 clove chopped garlic.  Saute garlic and shallot for 3-5 minutes.  Once cooked, add the garlic and shallot to a food processor.  Return to the red pepper and remove the skin and seeds.  Add the cleaned pepper to the garlic and shallot in the food processor along with the sherry vinegar and salt and pepper to taste.  Process pepper on high until very smooth, then pass mixture through a fine mesh sieve.  Set aside.  

Add ¼ cup olive oil along reserved garlic, oregano, basil, thyme, parsley, red pepper flakes and lime juice to a mixing bowl.  Season with salt and pepper and set aside.  

Place a large skillet over high heat.  Add vegetable oil and heat pan until very hot.  Season skirt steak heavily with salt and pepper before placing in pan.  Cook skirt steak 3-4 minutes on each side before removing from the pan and letting rest 5-10 minutes.


Toss together baby arugula, corn, and sliced shallot in a mixing bowl.  Drizzle salad with olive oil and fresh lime juice then season with salt and pepper.  Serve salad alongside skirt steak, topping with crumbled queso blanco.  Serve chimichurri over steak with red pepper coulis on side.  

A Better Chicken Dinner Part 2: Organic Chicken Breast, Celery Root Puree, Spring Vegetables, & Pickled Radish


Prep time:  30 mins.   Cook time:  30 mins.   Serves:  2


The carrots and asparagus are intentionally given minimal attention here , in order to bring out their freshness and true flavor.  Simply seasoning with salt and pepper and roasting will bring out natural sugars and give a clean, fresh palate to work with.  

Celery root is exactly what it sounds like, the tuber that celery stalks grow from.  It has the vegetative taste of celery with the earthiness of a russet potato.  Simmered until very tender and then pureed with buttermilk and butter gives it a mashed potato like texture while retaining most of the original flavor.  


Ingredients:

  • 1 whole split chicken breast
  • 1 whole celery root; peeled and cubed
  • 1 large leek; sliced
  • 4 whole carrots; peeled
  • ½ lb asparagus
  • 1 radish; sliced very thin
  • ⅓ cup white wine vinegar
  • 2 tbsp granulated sugar
  • 1 tbsp salt
  • 2 tsp celery seeds
  • 3 tbsp butter; divided
  • 3 tbsp vegetable oil; divided
  • ¼ cup buttermilk
  • 1 cup water
  • ¼ cup fresh parsley; chopped
  • Salt and pepper to taste

Method:

Preheat oven to 400 degrees.  In a small saucepan, add vinegar, tbsp salt, sugar, and celery seed.  Bring to a simmer over medium heat.   When vinegar mix is hot, pour over sliced radish.  Set aside and allow radish to pickle while you prepare the rest of your components.

Place a sauce pan over medium  and add cubed celery root and water.  Simmer celery root until very tender.  Strain celery root and add to a food processor.  Puree celery root, adding in 1 tbsp butter and buttermilk, until very smooth.  Season with salt and pepper and set aside.

Place a saute pan over medium heat with remaining butter.  Add leeks and season well with salt.  Allow the leeks to gradually cook down and become tender, occasionally stirring and adding a tbsp of water to make a light sauce.  

While the leeks are cooking, place a large skillet or saute pan over high heat with 2 tbsp of vegetable oil.  When the pan is very hot, place your chicken breast skin side down in the pan.  Immediately place the pan in the oven and roast chicken until it reaches an internal temperature of 160, about 15 minutes.  Flip the chicken over about halfway through the cooking time to ensure it cooks evenly.  

Meanwhile, add remaining vegetable oil to a saute pan and add carrots, seasoning with salt and pepper.  Place the pan in the oven and allow the carrots to roast until fork tender, about 10 mins.  Halfway through the cook time, add in the asparagus and roast both vegetables together.  Slice carrots in half to plate once they are finished.  


Asparagus Galette, with Bacon & Spring Onions


Prep time:  30 minutes    Cook Time:  30 minutes    Serves:  2-3


Perfect as an appetizer, a galette is a cross between a pie and a flat bread pizza.  Even though this recipe is easy to make, it can become even easier if you use a store bought pie crust.  Of course to some, combing the words “store bought” and “pie crust”  is a mortal sin.  Accordingly, I have included a recipe for a fool proof homemade pie crust as well.  To add another layer of indulgence and make your galette the perfect addition to your next brunch, add a fried egg or two on top.

Spring onions, or ramps, smell like garlic with a mild onion flavor.  If you are lucky enough, you can find them growing wild on a grassy hill in your yard.  Otherwise most local farmer’s markets will carry the sought after seasonal ingredient this time of year.  The leaves and the bulb are both edible, with the leaves being great tossed in a salad.  

The asparagus should be raw, peeled, then cut in half lengthwise before cutting again into thirds.  Be liberal with your toppings, especially the cheese. As a glaze, some people like to use egg wash on their pie crusts.  While this is a perfectly acceptable technique, I prefer brushing on some melted butter to give a deep golden color and add flavor.  Brush some butter on the edges right before you place the galette in the oven and then once again upon removing.  


Ingredients:

Pie crust

  • 2 ½ cups all purpose flour
  • 1 tbsp sugar
  • ¾ tsp salt
  • 1 cup (2 sticks) chilled unsalted butter; cut into ½ inch cubes
  • 6 tbsp (approx.) ice water

Galette

  • 1 cup asparagus; sliced in half and chopped into 3rds
  • ½ cup shaved parmesan
  • ½ cup crumbled feta
  • ½ cup shaved manchego
  • 1 shallot; finely sliced
  • ⅓ cup cooked bacon; chopped
  • ⅓ cup ramps; greens removed, finely chopped
  • ¼ cup parsley, finely chopped
  • ½ cup melted butter
  • 1 tbsp olive oil

Method:

For the pie crust add the flour, sugar, and salt in a food processor.  Add in the butter then pulse until a coarse meal forms. Gradually, blend in enough ice water so that moist clumps form. Gather  the dough into a  ball and divide it in half. Form the dough into two balls then flatten each into disks.  Wrap each disk in plastic and let chill for two hours at least.  If you are doing this ahead, the dough will hold for two days.

Preheat your oven to 400°.  Add  the bacon to a cold saute pan or baking tray and place in oven.  Cook the bacon until fully rendered, about 15 minutes, then place on a paper towel or wire rack to cool.  Coarsely chop your bacon and then set aside.

To assemble the galette, roll out your dough onto a well floured surface.   Form a circle about 12” and trim the edges.  Layer on your cheese then the asparagus, shallots, ramps, and bacon, leaving a one inch border.  Fold over the edge of the dough to form pleats.  Brush the edges of the galette with butter and drizzle the olive oil over the toppings.  Season lightly with salt and pepper and then place in the oven.  Bake 20-30 minutes, until cheese is bubbly and asparagus is tender.  Remove the galette and brush the crust with the remaining melted butter.  Let cool five to ten minutes before cutting.       

Lemon Panna Cotta, with Lemon Rosemary Marmalade, & Pistachio Crumble


Prep Time:  15 minutes    Cook Time:  30 minutes    Serves:  8


Panna Cotta is Italian for “cooked cream”,  and is a traditional northern Italian dessert that is sweetened and thickened with gelatin.  Panna cotta is an easy and approachable dessert for beginners, but can be a beautiful showcase for fresh ingredients and subtle flavors.

This recipe makes several servings and will hold for a couple of days in the fridge, so it’s great as a make-ahead dessert for a dinner party.  To remove the panna cotta from the ramekins and serve, run a knife along the edge of the ramekin.  Place a small plate over the top of the ramekin and flip, so the ramekin is on top of the plate and the panna cotta comes out.  Serve with the marmalade and crumble and fresh lemon zest.  


ingredients:

Marmalade

  • Peel from 3 lemons
  • ⅓ cup fresh lemon juice
  • ¼ cup fresh rosemary; finely chopped
  • ¼ cup water
  • ¾ cup sugar

Panna Cotta

  • 1 cup whole milk; divided
  • 2 tsp unflavored gelatin
  • 2 ½ cups heavy whipping cream
  • ½ cup sugar
  • 2 tsp vanilla extract
  • Peel from 1 lemon

Pistachio Crumble

  • ¼ cup pistachios; shelled
  • 6 tbsp butter
  • ½ cup flour
  • ⅓ cup sugar
  • ¼ tsp salt

method:

Place a large saucepan of water over high heat and bring to a boil. Add lemon peel and boil for 5 minutes. Drain, then repeat another two times. Let the lemon peel cool then slice into a thin julienne; then once more in half.

Place a small heavy saucepan over medium heat.  Stir in sugar, lemon juice, and water until sugar dissolves. Add in lemon peel and bring to a simmer.  Cook until mixture is reduced to 2/3 cup and an instant-read thermometer reads 225°.  Cover and chill.

Pour a ½  cup milk into a medium bowl and sprinkle in gelatin. Let the milk and gelatin sit until gelatin softens, about 15 minutes.

Meanwhile, combine cream, sugar, vanilla, lemon peel, and remaining ½ cup milk in a large saucepan. Bring mixture to a simmer over medium heat, whisking until sugar dissolves. Remove mixture from heat, cover, and let steep for 10 minutes.

Bring cream mixture back to a simmer.  Add gelatin mixture and stir until completely dissolved, then strain. Divide mix among eight ¾  cup ramekins. Chill uncovered until panna cotta is set, at least 6 hours. Cover and keep chilled.

In a food processor, pulse the pistachios a few times until roughly chopped. Add the flour, sugar, salt, and pulse until the ingredients are just combined. Add the melted butter and pulse a few times until the mixture forms pea-sized crumbs.

Transfer the crumbs to a parchment lined baking sheet. Bake until crumble starts to brown at the edges, about 15 minutes. Remove pan from the oven and using a flat spatula, flip the crumble over, piece by piece, so that the browned side is now on the bottom. The pieces will break apart; this is O.K. Bake for another 8 to 10 minutes, or until the crumble is golden-brown and very crisp. Transfer to a rack and let cool completely before breaking apart into crumbs.